ROHL Bridge Faucet
The ROHL Perrin & Rowe Bridge Kitchen Faucet blends perfectly elements of luxury, traditional and contemporary styling
As I’ve come to learn, designing a kitchen is like putting together a very complex puzzle. There’s a bevy of considerations to take into account, including its day-to-day usability, the amount of space at your disposal, and the specific style you’re trying achieve. Once you actually start breaking these considerations down, you quickly come to realize just how huge the amount of decisions you have to make are, and how difficult it can be to bring the solutions to all three together in perfect harmony.
Despite the many challenges I’ve faced in my own kitchen renovation, there is one item in the kitchen that was tremendously easy to select, probably more so than any other area – the kitchen faucet. From the moment I began seeking out my ideal kitchen, there’s been one brand that’s made its way into virtually all of the top kitchen designer’s spaces, and that brand is ROHL.
ROHL History
Before I delve into why I picked ROHL for my current kitchen, I wanted to touch briefly on who exactly ROHL is, simply because I’m a huge fan of companies with an interesting heritage. ROHL is in many ways the quintessential American company – the kind of company you read about, where one person with a vision manages to transform an entire market. In this case, it was a man with a vision that would eventually alter the kitchen faucet landscape as we know it.
The story begins in 1983, when a gentleman by the name of Ken ROHL recognized an opening in the kitchen faucet market: the concept of a pull-out faucet. Working out of a converted bedroom office and selling faucets out of the trunk of his car, Ken’s vision was one that was quickly met with success. Needing help, Ken’s son Lou joined his father in expanding ROHL, forging relationships with the company’s European suppliers before returning to California to expand operations here in the United States. Not long after, Ken’s oldest son Mark joined ROHL, opening an East Coast office in New York, and the family tradition was completed when Ken’s youngest son Greg joined the company 10 years after its start.
Today, it’s this tradition of family that continues to lead ROHL, with Lou serving as Chief Operating Officer, Mark serving as president of ROHL’s Eastern Division and Greg heading up ROHL’s Western Division. Just as impressive as its family heritage, however, is how ROHL has managed to expand from its pull out faucet roots. Today, the company offers an impressive range of kitchen and bath products, including both pull-out and non pull-out faucets, showerheads, sinks, etc. Their products are all exquisite, ranging from classic to contemporary, and all are built with an attention to detail that is absolutely stunning.
The ROHL Perrin & Rowe Bridge Kitchen Faucet with Sidespray Overview
In my own kitchen, the most difficult part of selecting a kitchen faucet wasn’t the brand, it was selecting the particular ROHL kitchen faucet that best suited my style. Truthfully, I could pick almost any of their kitchen faucets and be completely happy, but in the end, I settled on the ROHL Perrin & Rowe Bridge Kitchen Faucet with Sidespray, a gorgeous bridge style kitchen faucet with goose neck design.
In selecting the Perrin & Rowe Bridge Kitchen Faucet, my goal was to find a faucet that would bring a classic feeling into the kitchen irregardless of cabinet type. Although I haven’t yet finalized my kitchen cabinet design, I tend to favor a slightly more contemporary style of cabinets with classic elements mixed in. Mick de Giulio, for example, is a kitchen designer that exemplifies the idea of blending contemporary with traditional. So I wanted a faucet that would allow me to bridge the gap between both styles, allowing me the ability to potentially choose a more contemporary styled cabinet, but keeping the kitchen anchored with traditional elements. And that’s exactly what ROHL’s Perrin & Rowe Bridge Kitchen Faucet does.
It perfectly bridges the gap between contemporary and traditional, and frankly, it could be used in virtually any style of kitchen. I’ve seen it used in country farmhouse style kitchens, I’ve seen it used in ultra luxurious English kitchens, I’ve seen it used in Hamptons style kitchens, and I’ve seen it used in the aforementioned traditional and contemporary kitchens. There’s just something about the Perrin & Rowe Bridge faucet’s design that makes it perfectly adapted for almost any space.
ROHL Perrin & Rowe Bridge Kitchen Faucet with Sidespray Design
In selecting a ROHL faucet, some of the elements to consider are handle type (and number of handles), bridge vs. no bridge, and the arc and height of the faucet itself. ROHL faucets span the design range from what they call their Country Kitchen collection up to their Modern Kitchen collection, with many of their Perrin & Rowe line stylistically falling in the middle. No matter which line you look at however, the common thread among all ROHL faucets is the gorgeous, meticulous attention to detail and character that exudes from the entire lineup. They are in many ways sculptures for your kitchen – metallic works of art that while not always the centerpiece of your kitchen, play an integral role in complimenting it and bringing it all together.
In my case, I wanted a style that bordered on traditional, but one that could be paired with other more contemporary kitchen elements, and that’s exactly what the ROHL Perrin & Rowe Bridge Kitchen faucet does. It’s sweeping gooseneck design is one traditionally found on a more contemporary faucet, capturing your eye with it’s beautiful shape and giving height to the faucet. Paired with it, a bridge design with traditional lever handles keep the faucet rooted in traditional, perfectly blending together attributes of luxury, traditional and contemporary styling. Lastly, an additional sidespray matches the styling of the levers, adding extra functionality to the already stunning design.
ROHL Perrin & Rowe Bridge Kitchen Faucet with Sidespray Construction
The ROHL Perrin & Rowe Bridge Kitchen faucet is incredibly well crafted, built from solid brass and absolutely stunning in person. I’ve already made mention of this, but the Perrin & Rowe Bridge kitchen faucet really does feel like a sculpture when viewed and touched in person. It’s so stunning and well-built, you forget it’s there to serve a purpose. Despite having seen the faucet online, in too many kitchens to count, it’s a faucet that’s even more beautifully crafted than I anticipated, and one that really does need to be witnessed firsthand to be truly appreciated – both for its quality and style.
For my home, I opted for the polished chrome finish, as my kitchen will note a lighter, almost white cabinet color with chrome accents. Depending on your style, however, there’s a total of five finish options for the ROHL Perrin & Rowe Bridge kitchen faucet – the aforementioned polished chrome, polished nickel, satin nickel, English bronze and Inca brass.
ROHL Perrin & Rowe Bridge Kitchen Faucet with Sidespray Conclusion
Selecting the ROHL Perrin & Rowe Bridge Kitchen Faucet with Sidespray wasn’t a difficult decision for me, but it was one that I would unequivocally recommend to anyone considering a faucet. ROHLas a whole produces a range of stunning kitchen and bathroom products, and the Perrin & Rowe Bridge faucet is one of the jewels in their lineup. It stunning design bridges the gap between traditional and contemporary, it notes an understated luxury that’s as much at home in an ultra extravagant English kitchen as it is in a country kitchen, and it’s built with a quality that’s absolutely impeccable. In my opinion, for my kitchen, it’s simply the perfect faucet.
To learn more about the ROHL Perrin & Rowe Bridge Kitchen Faucet with Sidespray, you can find more info at the official ROHL website. Pricing for the faucet varies, but you can find it at your local showroom or on Amazon.com. You can also see more photos of the ROHL Perrin & Rowe Bridge Kitchen Faucet with Sidespray in the gallery below.
Electrolux Icon French Door Refrigerator
The Electrolux Icon French Door Refrigerator offers an ingenious storage design in a beautifully industrial exterior
In the quest for a perfect kitchen, refrigeration is a key element to consider when planning the necessary kitchen appliances. In the old days, kitchen refrigeration was fairly straightforward – pick a fridge, and you’re done. Today, it’s a far more complex challenge, as refrigeration varies tremendously, depending on your needs. There’s french door refrigerators, side-by-sides, built-in all fridge and all freezers – with varying depths, widths and capacities. In addition, for more specialized refrigeration, under counter refrigeration drawers, wine coolers, etc. all provide the ability to fine tune refrigeration to meet your specific culinary needs.
In assessing my own kitchen’s refrigeration, I initially was leaning towards a large refrigeration option – namely, a combination of the 32″ all fridge and all freezer units. But the more I studied the amount of kitchen space at my disposal, the more I realized I didn’t want to sacrifice that much cabinet area. I started looking at smaller refrigeration options paired with specialized refrigeration units, and I eventually decided on the Electrolux Icon French Door Refrigerator, the Electrolux Icon refrigeration drawers, and the Electrolux Icon wine cooler. In doing so, I have significantly more options in terms of integrating the refrigeration units in different areas of the kitchen, and in the case of the wine cooler, I can even integrate it into a different area of the house, if I so desire.
I took delivery of all three units precisely a month ago, and having used them for the past four weeks, I’ve been exceptionally happy with my decision to break up the refrigeration into multiple components. I’m going to be bringing you my experiences with all three Electrolux Icon appliances in the coming weeks, but today I’m going to look at the biggest unit of the three: the Electrolux Icon French Door Refrigerator.
Electrolux Icon French Door Refrigerator Design
In selecting a new refrigerator, the first element you’ll have to consider is it’s design, with french door, side-by-side and all-fridge / all-freezer combos the more common choices. Coming from a side-by-side, I was already familiar with both their advantages and drawbacks. On the plus side, they require minimal door clearance to open and the top half of the freezer is more easily accessible. The downside, however, is a major one: it’s virtually impossible to fit any large platter items into the fridge. When entertaining, this is a serious, serious problem.
As for the all fridge / all freezer option, I loved the idea of having that much refrigeration at my disposal, but the downside was giving up over five feet of cabinet space to make it happen. Plus, despite wanting a large freezer, in truth, much of its space would have gone unused, as neither I or my family tends to eat much frozen food. The last negative is door size – because all fridge and all freezers use large single doors, they require more clearance to ensure the proper flow of traffic through the kitchen.
This led me to look at the Electrolux Icon French Door design. It is, in a nutshell, the best of both worlds. Up top, the large refrigerator area opens completely, making it possible to store a tremendously large serving platter or wide item with ease, much like an all fridge unit. Because it utilizes two doors up top, however, it requires much less clearance than a single door – similar to that of a side-by-side. As for the negative, the lone downside is that the freezer is located at the bottom of the unit, making it a less accessible than the other options. However, when realizing how little I use the freezer in relationship to the refrigerator, I’ve found the french door design to be far more usable than my previous side-by-side unit, and as I’ll discuss in the next section, the freezer’s storage space and divided drawer design further alleviates any accessibility issues you may be worrying about.
Electrolux Icon French Door Refrigerator Space
In making the switch to the Electrolux Icon French Door Refrigerator, my biggest concern was space. Because it notes a cabinet-depth design, with an exact cabinet depth of 23 5/8″, the Electrolux Icon notes a 23 Cu. Ft. capacity – larger than many other french door refrigerators, but slightly less than the side-by-side I was replacing. Despite my initial concerns, a month later, I’m ecstatic with the switch, especially in terms of size.
Due to its incredibly thoughtful design with completely customizable shelving, the Electrolux Icon French Door refrigerator easily holds everything my previous refrigerator was capable of holding, and then some. On the left side of the refrigerator is a spacious area for milk and large liquid items, with a second adjustable shelf above, giving you the ability to store a second level of taller items – including half gallons of milk, liquids, etc. On the right side of the fridge, there’s a total of three adjustable shelves along with the base shelf (four levels in total), with all the adjustable shelves noting thin glass spill-resistant designs thanks to their upwardly curved edges. The beauty of the adjustable shelves, however, is the tremendous amount of flexibility they afford. Should you prefer to store your liquids in the doors, for example, you can move one of the adjustable shelves from the right side of the fridge to the left, thus providing multiple full-length shelving spans – perfect if you have multiple large serving trays.
And while we’re on the subject of doors, each door notes its own shelving, ideal for liquids and/or condiments. On the left side door, there’s a total of two shelves, with the top smaller shelf big enough to hold a half gallon of milk, whereas the bottom shelf is easily capable of storing several bottles of wine. On the right door, there’s a total of two adjustable shelves, an upper enclosed storage bin, and a bottom mounted shelf that tips down for easier access. Personally, I use the door shelving for various condiments and small items, but because of their adjustability, you can easily use them for a variety of taller items as well, per your own needs. It’s incredibly customizable, and incredibly efficient at storing whatever you need it to.
Moving past the Electrolux Icon’s vast amount of adjustable shelving, another storage feature I absolutely love is a pair of side-by-side custom temp drawers – perfect for storing fresh produce – and each of which offers individual humidity controls. Underneath the two side-by-side custom temp drawers, a third larger custom temp drawer spans the width of the fridge, allowing you to set a custom temp for virtually anything you can think of. There’s a total of 9 preset settings including meat/poultry, white/sparkling wine, fish/shellfish and cheese; and there’s a total of 3 customizable favorite settings that allow you set any custom temps you desire. The beauty of the drawer (in addition to its customizable temperature) is its size, with space big enough for a birthday cake, numerous bottles of wine, a plethora of cheese, or pretty much anything that needs a large, uninterrupted surface area.
That takes care of the Electrolux Icon French Door refrigeration storage; then there’s the freezer. As is the case with the upper refrigerator, Electrolux ingeniously engineered the freezer with a series of adjustable storage bins. There’s a total of two individually movable shelves with dividers, allowing you to arrange your freezer with extreme precision. Because it’s common for frozen food to be packaged in boxes, the shelving makes it easy to arrange your frozen goods in an easy-to-find manner, with minimal wasted space. As for the lower bin, it’s a deep, spacious area perfect for large frozen items. In my freezer, I use the left half of the lower bin to store frozen poultry (I currently have a frozen turkey, multiple packs of organic chicken breasts, etc.), whereas the right side is designated for beef and other red meats (of which I have plenty).
It’s really a fantastic design, and while I was unsure how much the freezer would be capable of holding, I’m amazed at how much more efficient the Electrolux french door design is than my outgoing side-by-side. There’s so much less wasted space, and the sliding shelves make it absolutely simple to organize and find whatever frozen items I need. And that’s really the greatness of the Electrolux Icon French Door Refrigerator as a whole. Its intelligent design makes it so much more accessible than other refrigerators. Unlike in other designs, where food goes in, gets moved to the back, and is discovered a month later, everything in the Electrolux Icon is so much more visible. Best of all, because you can make the storage work exactly the way you need it to, it’s still capable of holding a tremendous amount of food. It’s simply brilliant.
Electrolux Icon French Door Refrigerator Styling
When selecting an Electrolux Icon french door refrigerator, there’s a total of four design options, with key differences being firstly your choice of handles in either the Professional or Designer series, and secondly, whether or not the electronic display, ice maker and water dispenser are visible on the outside of the unit. I personally love the look of the Electrolux Icon Professional Series, which notes more industrial, rounder handles, and I opted for exterior electronic controls and ice maker, simply because I preferred having the controls easily accessible on the outside. All of the units look great, however, and you really can’t go wrong with any.
As with all the appliances in the Electrolux Icon range, the French Door Refrigerator notes a gorgeous industrial design with styling at home in virtually any kitchen. With a completely flat front, the Electrolux icon refrigerator looks like solid hunk of steel – a style further complimented by the finished stainless steel sides. Finished steel sides are especially important for stand alone designs or installations where the edge of the refrigerator is partially exposed, as there’s nothing worse than having a kitchen full of stainless steel appliances only to have the black edge of your refrigerator exposed.
Inside, my absolute favorite styling element is the theater lighting. When you open the door, gorgeous LED lighting located throughout the refrigerator illuminates your food, and while it sounds like a minor feature, it’s a gorgeous lighting design that just makes your food look better, and is one of my favorite things about the refrigerator. Another interior element I’ve come to love is the thin glass shelving, which not only looks great, but makes cleaning up spills a breeze. As a whole, the Electrolux Icon French Door Refrigerator looks fantastic, and it matches the rest of my Electrolux Icon appliances beautifully.
Electrolux Icon French Door Refrigerator Performance
Using the Electrolux Icon French Door Refrigerator for the first month, I have nothing but positive things to say about it. In assessing its most important duty – it’s ability to keep food at the appropriate temperature – the Electrolux Icon has performed flawlessly, maintaining its set temperature perfectly in both the main storage area and the custom temp drawer. And because you can set the custom temp drawer to a different temperature than the main area, you can keep specific foods fresher, longer. In truth, there’s not a whole to say about the refrigeration element, other than it works, exactly as you expect it to.
From a technological standpoint, the Electrolux Icon has numerous features that aid in its everyday use, with one of the most used in my family being an alert if the door is left open. My two year old loves sneaking into the fridge when no one is looking, so having an audible alert when he leaves the door open is a fantastic feature. Another thing I love is the electronic control panel on the front of the fridge, allowing you to control everything from the refrigerator and freezer temperatures, ice and water settings, sound settings, etc., all from a single, easy-to-use panel. Other notable technology features that I’ve yet to use (but still am happy to have) include a power failure alarm as well as an alert if either the freezer or refrigerator goes above a certain temperature.
The final performance element to note is the ice maker and water dispenser, both of which have worked as advertised. Featuring a PureAdvantage filtration system, the Electrolux Icon produces crystal clear ice in both regular and crushed varieties, with the capability to make up to 9 pounds per day. Compared to my previous refrigerator, the ice is remarkably clear and tastes significantly better, but my go-to for ice is still my dedicated Electrolux Icon ice maker. For those without a dedicated ice maker, however, the Electrolux Icon refrigerator is the next best thing.
Electrolux Icon French Door Refrigerator Conclusion
A month after purchasing the Electrolux Icon French Door Refrigerator, the Electrolux has become an absolutely gorgeous new addition to my kitchen. Its storage is ingeniously designed, helping it hold more food than my outgoing refrigerator, despite its cabinet-depth design. It’s theater lighting is stunning. And its beautifully industrial design makes it at home in virtually any kitchen. There simply isn’t anything not to love about the Electrolux Icon French Door Refrigerator, and it’s a fantastic choice for anyone currently shopping for new refrigeration in their own home.
Pricing for the Electrolux Icon French Door Refrigerator varies between $3,200 and $3,700, with pricing higher should you opt for the external ice maker and electronic control panel. You can learn more about the Electrolux Icon French Door Refrigerator at the offical Electrolux Icon website, and you can see photos of the Electrolux Icon French Door Refrigerator Professional Series in the gallery below.
Capital Culinarian Range
The Capital Culinarian is the world's best professional home range, offering the absolute highest level of performance and design
Since the beginning of time, man has been dedicated to the art of creating culinary masterpieces. What exactly those culinary masterpieces are varies from culture to culture, whether it’s a beautifully prepared Pad Thai from Thailand, a slow-cooked Rendang from Indonesia or a mouth watering burger from your favorite burger joint right down the street. No matter what your cuisine of choice, the common thread among a vast majority of them is that they rely on power. They rely on a method that effectively delivers heat, whether its copious amounts of high heat or a gentle simmer of low heat.
Step into the kitchen of virtually any restaurant, and the range is the absolute single most important element, aside from the food itself and the one preparing it. The range is the backbone of the kitchen, allowing chefs to take what was once ordinary food and transform it into something magical… something extraordinary. I vehemently believe that food is the key to the soul, and it is, quite possibly, the true secret to happiness. There is simply nothing that creates a greater sense of fulfillment – a greater sense of joy – than a perfectly cooked meal.
It’s a truth that has, in many ways, governed my choices in the kitchen. In my never ending quest for culinary nirvana, I have analyzed and assessed absolutely every item I use with excruciating detail. But when it came time to select a new range, there was no other item in my kitchen that I devoted more time to studying and researching. Creating heat, and having the ability to control heat down to the finest detail, is, in my opinion, the single most important ability when cooking in the kitchen.
Studying ranges, I learned a tremendous amount about the principles of heat delivery –gas vs. electric, sealed vs. open burners, BTU ratings, etc. – and what I learned is that there is one range that has absolutely no equal in the home culinary world. That range is the Capital Culinarian, and it is without question the most ingeniously designed, superbly performing home range on the planet. Whether from a heat delivery standpoint, a design standpoint, a feature standpoint – there simply isn’t anything that begins to rival the brilliance of the Capital Culinarian.
You may be questioning my strong opinion of the Capital Culinarian so early on in the article, and rightly so. Granting title as the best home range on the planet is a bold claim, and for owners of Wolf, Viking, Bluestar, or any of the other professional home range manufacturers, one that’s immediately going to be brought into question. But the truth is what it is. Forget everything you’ve heard from your local appliance salesmen; forget the marketing claims made by other professional range manufacturers. I’m going to tell you point blank why the Capital Culinarian has no equal, and I’m going to tell you why from a purely objective standpoint. No agendas; no ulterior motives; just from someone that absolutely loves to cook, and wants the highest degree of performance and flexibility while doing so.
Range Basics
Before I go in-depth about the Capital Culinarian in particular, I wanted to mention briefly some of the key elements of ranges in general. When considering ranges, you’ll immediately be inundated with a variety of choices, with three of the most important being whether or not to opt for a gas range, whether or not to opt for sealed burners or open burners, and how many BTUs you’ll need.
For the first question, as to whether or not to opt for a gas range, the answer is unequivocally yes. The majority of professional chefs use gas ranges, with the key reason being that gas offers an exemplary level of heat control. Adjustments to the temperature are immediately transmitted to the cooking surface – something vital when cooking delicate food items – while gas is also significantly more effective at allowing fine tuning of low heat.
As to the second question – whether to opt for sealed burners or open burners – this is where you’ll note a significant amount of opinion, depending on the source. Look at the majority of professional home ranges, such as Wolf, Viking, etc. and talk to their corresponding sales associates, and you’ll be extolled with the virtues of a sealed burner system. In truth, sealed burners are inferior to open burners. Sealed burners were developed to make cleaning easier in the event of spills, but the trade-offs are uneven heat distribution and wasted heat being released into the kitchen. Because a range’s sole purpose is to deliver even heat distribution and allow fine tuning of the heat delivered, it’s a trade that anyone seeking a truly professional home range should be unwilling to make. That’s why virtually all commercial kitchens use ranges equipped with open burners. Open burners note significantly more even heat distribution, significantly less heat waste, and in truth, they’re still remarkably easy to clean and maintain in the event of spills (we’ll talk more about cleaning open burners later).
Lastly, as to how many BTUs to opt for, the answer is the more BTUs, the better. BTU, short for British Thermal Units, refers to the amount of heat required to raise the temperature of 1 pound of water 1 degree Fahrenheit. In the real world, this simply means the higher your range’s BTUs, the hotter your range can get. This is vital with any cooking methods requiring high heat, such as searing, wok cooking and blanching, and it also helps reduce cooking time across a variety of tasks. I’ll talk more about BTUs later, but if you’re worried you can have too many BTUs, don’t. It’s easy to turn down the heat on a burner when necessary, but adding BTUs is an impossible feat.
All of this leads to a singular conclusion: for those that demand the absolute highest level of performance in the kitchen, a gas range featuring open burners has no equal. Furthermore, the more power (BTUs) at your disposal, the better. Interestingly enough, this eliminates virtually all of the professional, commercial style home range manufacturers, save for two: Capital and Bluestar. And as you’re about to learn, when comparing Capital to Bluestar, Capital absolutely decimates Bluestar in every way, shape and form. Read on, and you’ll learn precisely why the Capital Culinarian has no equal.
Capital Culinarian Overview
There are some products that are difficult to define in terms of exactly how they fit into the market. Are they the best from a performance standpoint, are they the best from a design standpoint, are they the best at their price point, etc. Defining the Capital Culinarian range lineup is exactly the opposite. It’s the best. Period. It doesn’t matter what the question is, it is the best. Heat delivery and power, function, design – the Capital Culinarian simply has no equal.

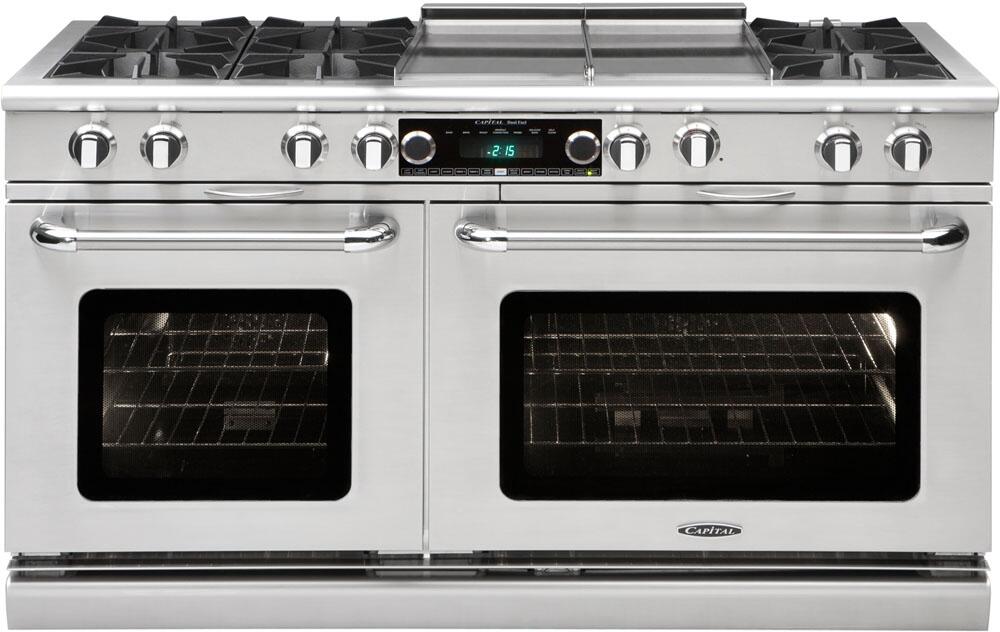
Capital Culinarian Range CGSR604GB2 range top with 23,000 BTU burners, grill and griddle
Let’s talk heat delivery. From a performance standpoint, it’s the best professional home range on the market. Every burner on the Capital Culinarian boasts a searing 23,000 BTU open flame. Whether it’s the four burners on the smallest 30″ Culinarian all the way up to the maximum of eight burners on the 60″ Culinarian, every burner notes the same incredible heat output of 23,000 BTUs – higher than any other home range available. Even more impressive, however, is that every burner, despite being the highest powered home burners on the market, also features the ability to simmer down to 138 degrees – low enough to simmer chocolate directly in the pan, without a double boiler. They’re quite simply the most advanced burners you’ll find, anywhere, on any home range.
From a functionality standpoint, the Capital Culinarian again has no equal, offering an incredible range of options for the home chef. On the top cooking surface, options available (starting with the 36″ model) include the aforementioned high powered burners, the industry’s highest powered range-top grill, and the industry’s highest powered thermostatically controlled range-top griddle. There’s also an optional wok ring, making cooking with a wok an absolute joy. Matching the Culinarian range top’s incredible functionality, the Culinarian self-clean oven models note an equally impressive feature range, with oven options available including bake, broil, convection bake, convection broil, open-door broil and self-clean. Better still, all self-clean Culinarian ranges include a motorized rotisserie, offering both standard rotisserie and convection rotisserie options. Quite simply, there are virtually no methods of cooking the Capital Culinarian isn’t capable of performing with pure brilliance.

Capital Culinarian Range knobs, oven handle and finish closeup view
Lastly, and just as importantly, there’s the design. The Capital Culinarian is, in no simpler terms, a masterpiece of engineering. Every weld, every contour, every detail is absolutely flawless. Burner grates are perfectly flush, allowing easy movement of pans throughout the cooking area. Knob markings are etched, meaning they won’t fade over time. Easy glide rip trays make cleanup a breeze. Oven racks are on rollers, offering significantly easier movement of heavy items. It’s clear that Capital’s engineers have paid meticulous attention to absolutely every element of the Culinarian down to the most minute detail, both from a style and usability standpoint. I’ve analyzed every element of my own Culinarian, and to be honest, I’ve yet to find fault with it. It’s absolutely fantastic.
You may be wondering which Capital Culinarian I opted for, and as you’ll see in the photo gallery, I splurged, opting for the largest range available: the 60″ Capital Culinarian CGSR604GB2, which features six burners, a grill and a griddle option. From here, I’m going to take a slightly more in-depth look at the Capital Culinarian’s features, and compare it to some of the other professional style ranges on the market.
Capital Culinarian Burners
If there is one singular element that sold me on the Capital Culinarian, it would have to be the burners. The Culinarian’s burners, whether from a power, versatility and heat distribution standpoint, are unmatched by anything else available, bar none. Firstly, they’re the most powerful, with every burner on every Capital Culinarian rated at 23,000 BTUs/hr. But just as importantly, they offer absolutely precise fine-tuning, with every burner also boasting true simmering functionality, down to 138 degrees – low enough for the most delicate sauces, and low enough to melt chocolate directly in the pan, without a double boiler. In terms of heat distribution, the Culinarian’s open burner design does an incredibly good job at distributing heat evenly across the bottom of the entire pan, with no hot spots around the edges, as is typical with all sealed burners. Simply put, they’re best residential range burners, anywhere.

Capital Culinarian Range 23,000 BTU open burners
For the sake of comparison, BlueStar ranges are the only competition that comes close, offering 22,000 BTUs/hr in their RNB models, but there are two key, monumental differences. Number one, BlueStar ranges offer only two 22,000 BTU burners, irregardless of range size. All other burners are rated at 15,000 BTUs – equivalent to that of virtually all other standard ranges. Secondly, and even more detrimental to the BlueStar, in order to achieve a true simmer, you have to use a dedicated simmer burner. Not only do you need to give up space for the simmer burner, you’re also limited to one simmer burner per range. From here, competition drops off significantly, with Viking offering one optional 18,500 BTU burner on select ranges (the rest are 15,000 BTUs), Wolf offering exclusively 16,000 BTU burners, and other range manufactures all coming in well below the 20,000 BTU mark. You simply won’t find anything that can come close to the performance and flexibility offered by the Capital Culinarian.

Capital Culinarian Range 23,000 BTU open burner closeup
As much as I love the power of the Culinarian’s burners, I’m equally enamored with the burners’ construction. The burner grates and the burners themselves are solid cast iron – heavy enough to withstand the Apocalypse – and incredibly easy to clean when necessary. Simply scrub with soap and warm water, turn on the burner for about 10 minutes to dry, and you’re done. And while we’re on the topic of cleaning, each burner features a stainless steel drip tray that’s easily removable (and cleanable), whereas additional EZ-Glide slide-out drip trays (that are both fully extendable and removable) offer a secondary level of protection from spills and make cleanup a breeze.
There’s simply no other range that offers the performance and capability of the Culinarian’s 23,000 BTUs – it’s truly in a league of its own.
Another element I love is the perfectly flat cooking area created by the Culinarian’s cast iron grates, meaning it’s simple to slide pots and pans from one burner to another. For wok cooking, an optional wok ring is available, allowing you to replace any of the individual burner grates with the wok ring. When in place, the wok ring not only holds your wok with remarkable security, it also channels the heat directly to the bottom of the wok, eliminating hot handles and wasted heat. Lastly, other features worth noting include individual point ignition (so if one ignitor fails, other burners aren’t affected) as well as auto ignition and re-ignition.
As I already noted, if you have to pick one reason the Capital Culinarian supersedes all others, it’s the burners. There’s simply no other range that offers the performance and capability of the Culinarian’s 23,000 BTUs – it’s truly in a league of its own.
Capital Culinarian Grill and Griddle
When selecting a Capital Culinarian, your range-top options vary based on the size of the range you select. On the 36″ Culinarian model, you can opt for either a 12″ grill or 12″ griddle, whereas the 48″ and 60″ ranges offers the ability to add either a 12″ grill or 12″ griddle, a 24″ grill or 24″ griddle, or a 12″ grill and 12″ gridlle combo. On my 60″ Culinarian range, I opted for a six-burner, 12″ grill and 12″ griddle combination, and I’ve been ecstatic with my choice. The flexibility of both the grill and griddle allows me to cook virtually everything, and for anyone considering either a 48″ or 60″ Culinarian, I highly recommend both.
Looking at the grill and griddle independently, the Culinarian’s 12″ grill notes a remarkable 18,000 BTUs, outperforming every other range on the planet and rivaling the performance of many outdoor grills. To create even heat distribution across the entire grill surface, Capital utilized hybrid radiants with ceramic rods encased in stainless steel, topped off with incredibly heavy duty cast iron grill grates that are reversible. On one side, grooves in the cast iron funnel drippings into the grill’s drip tray and disposal area, whereas the other side offers wider, non-grooved grates, perfect for more delicate items such as seafood. The end result is indoor grilling that can by all standards replace traditional outdoor grilling, and makes grilling meats, vegetables, or anything else you enjoy grilling possible from the comfort of your own kitchen.

Capital Culinarian Range grill closeup CGSR604GB2
As for the 12″ griddle, it shares the same 18,000 BTU output found in the grill, and is thermostatically adjustable from 150 – 550 degrees. Constructed from 3/8″ thick stainless steel, the Culinarian’s griddle has too many uses to list. Breakfast, of course is a given: eggs, pancakes, bacon… you get the idea. For lunch and dinner, I love it for cheese steaks; I love it to fry mushrooms and onions to pair with grilled items; and something I’ve come to learn quickly, at its lowest setting, you can use it as a warming surface, keeping pots and pans warm as you prepare other dishes. If you, like me, love breakfast in a cozy diner, you’ll love the griddle, and using it as a warming plate just adds to its functionality. Not surprisingly, the 24″ grill and griddle share virtually all the same attributes as their 12″ counterparts, save for the fact they each note 30,000 BTU gas burners in addition to their wider size.

Capital Culinarian Range griddle closeup CGSR604GB2
And on a design note, another fantastic feature that relates to both the grill and griddle is the fact that Capital includes a beautifully designed cover for both, so in the event you want to cover either when not in use, you can do so in a way that blends gorgeously with the rest of the Culinarian’s already stunning design. The handles match perfectly to those found on the EZ-Glide slide-out drip tray, and the overall look is perfectly seamless and gorgeous when in place.
Capital Culinarian Oven
As is the case with the rest of the Capital Culinarian, the oven again sets a new precedent in terms of the capabilities it offers for home use. Ingeniously, Capital chose to include the oven size found on their 36″ range (4.6 Cu Ft.) in the 48″ and 60″ ranges as well, with the main oven noting 30,000 BTUs of heating power along with an 18,000 BTU infrared broiler. On the 48″ Culinarian, the secondary oven is 2.1 Cu Ft. and 15,000 BTUs, and on the 60″ Culinarian, the secondary oven is 3.1 Cu Ft. and 22,000 BTUs.

Capital Culinarian Range CGSR604GB2 with both oven doors open
There are two key reasons Capital’s uniform main oven size and variable secondary oven sizes works so well. Firstly, by offering a larger primary oven, there’s a tremendous amount of space available when cooking larger items, including the ability to use full size baking sheets. Ask my wife, and she’ll tell you the same thing: it really is a baker’s dream. On the other end of the spectrum, in the event you need to bake smaller items or side dishes, the smaller secondary oven is a superb benefit, as it heats up more quickly, thus reducing the time you spend in the kitchen. In my opinion, Capital’s choice of variable oven sizing, especially on the 60″ Culinarian, is far superior to conventional split oven designs where both ovens are equally sized (i.e., BlueStar, Wolf, Viking, etc.).

Capital Culinarian Range CGSR604GB2 right oven with Flex-Roll oven rack extended
From a functional standpoint, the Culinarian oven notes bake, broil, convection bake, convection broil, open-door broil and self-clean options, as well as both rotisserie and convection rotisserie modes. Part of the benefit of the larger oven size was that it gave Capital the ability to incorporate a motorized rotisserie system, allowing perfectly prepared whole chickens and turkeys, rack of lamb, cuts of pork and beef, or any other meats you can think of, all of which taste absolutely perfect and are superbly simple to create. A whole chicken takes quite literally an hour, and it’s ready to serve. It’s incredible how good meat prepared on the rotisserie tastes, and no other professional home ranges have one. Another much welcomed feature is the addition of Flex-Roll oven racks, which creates a tremendously smooth sliding action when moving the oven racks in and out, especially with heavier items. There’s a total of five oven rack positions for the Flex-Roll system, and three racks per oven.
Performance wise, I’ve just taken delivery of my Capital Culinarian, so I’m going to save a detailed look at using the Capital Culinarian for another article, but I will say the main oven heats up remarkably fast – it takes less than 10 minutes to reach 350 degrees. While I haven’t tested other manufacturers myself, online figures note the oven in the 60″ BlueStar takes over 16 minutes to reach 350 degrees, despite its smaller size. It’s just another testament to the incredible performance prowess of the Capital Culinarian, and one of the many reasons the Culinarian is unrivaled by anyone in the industry.
Capital Culinarian Design
It’s a masterpiece of engineering, down to the finest detail.
You’d think that in a range that absolutely redefines the standards of professional cooking in the home, there has to be at least one flaw in its armor. Considering its incredible performance, surely Capital must have overlooked some element of its design. But they haven’t. It’s a masterpiece of engineering, down to the finest detail. There’s a quote by Walt Disney, where he stated: “You don’t build it for yourself. You know what the people want, and you build it for them.” And that’s exactly what Capital has done. They understand the fact that people want the absolute highest level of performance – performance capable of rivaling that of a commercial range – but they don’t actually want a commercial range. Commercial ranges are ugly and their fit and finish are terrible, neither of which is surprising, really, considering they’re not meant to be looked at, they’re meant to be used.

Capital Culinarian Range knobs, oven handle and finish closeup view
A professional home range, however, is an entirely different animal. They’re meant to be used, but they also serve as the focal point of a kitchen. So as much as people want commercial level performance from a professional home range, they also want an equal amount of attention paid to its design. In this regard, it’s clear (yet again) the Culinarian sets a new benchmark for design.
The Capital Culinarian is, in no simpler terms, stunning. Every detail, every weld, is absolutely flawless. I don’t want to say the Culinarian looks residential, because I don’t want to diminish its beauty and imply that it looks like other lesser ranges. But at the same time, it’s not commercial either. There are no sharp edges, there are no elements that appear unfinished, there are no pieces that fit poorly. Instead, it manages to find the perfect balance between residential and commercial. It’s a design that doesn’t hide the incredible amount of performance at your disposal, but at the same time it’s a design that still perfectly exemplifies what the focal point of your kitchen should look like.

Capital Culinarian Range knobs and finish closeup view
On the top of the range, for example, the stainless area that surrounds the burners, including the edges, is welded and polished, creating a completely uniform surface area with no seams or gaps. The same is true on the oven doors, and even on the lower kick plate – everything looks like a singular, sculpted block of stainless steel. Throughout the Culinarian, chrome accents on the control knobs, drip tray handles, grill/griddle covers and the edges of the oven handles provide beautiful contrast to the stainless steel construction. Large oven windows with a bevelled surround not only look gorgeous, they give an enhanced view inside the oven while baking. As I already noted, you can quite literally go over every piece of the Culinarian, and you’ll immediately see that each part has been thought out and beautifully finished.
Compared to other professional home ranges, I can say without question the Capital Culinarian notes an attention to detail unrivaled by anyone. And as I learned when researching ranges in person, when you compare it to BlueStar, the design gap is even greater. The BlueStar is, quite literally, the polar opposite of the Culinarian. Whereas everything on the Culinarian is precise, everything on the BlueStar looks unfinished. Sharp edges, uneven finishes, poorly fitting grates and uneven gaps in the panels were some of the problems plaguing the BlueStar, none of which are present on the Culinarian. Going back to what I said earlier, I think that’s the key difference between Capital and BlueStar (as well as every other range manufacturer): they know what customers want, and they build it. Customers don’t want to have to choose between performance or design, they want both. And that’s precisely what the Capital Culinarian gives them: the absolute highest level of performance, wrapped in a gorgeously designed, exquisitely crafted design.
The History of Capital
In understanding what makes the Capital Culinarian so remarkable, one look at the history of Capital, and you’ll immediately understand why the Culinarian sets such a precedent in the professional home range market. In, truth, the story of Capital begins not with the history of a company, but rather the history of a single individual. His name is Surjit Kalsi, and he is to home cooking what Michael Jordan was to the NBA; what Michael Jackson was to music; or what Steve Jobs was to the tech industry. He’s a legend, a revolutionary, an innovator. In no simpler terms, he’s taken the idea of cooking at home, and he’s elevated it to another stratosphere.

Capital Culinarian Range Capital Logo
Surjit’s incredible journey began over 50 years ago, and it reads like the script from a Hollywood movie.
The story begins in 1956, following Surjit’s graduation from Bombay University in India. After moving to London and working as a lab technician in the R&D department of Main Gas Appliance Company, Surjit created the world’s first dual flow gas burner, self-cleaning gas oven, universal burner, and electric ignition system – helping catapult him up the corporate ladder and become member of the Board in record time. From there, Surjit followed his dreams of making his own mark on the cooking world, moving back to India to launch his own gas appliance company. Ultimately, the timing was off, as shortages of raw materials and economic instability plagued the company, leading Surjit to make the decision to move to the U.S. after a decade of running his own company in India.
Surjit moved himself and his family to Baltimore, where he took a job as a design engineer for a commercial appliance manufacturer for a mere $20,000 a year. Knowing he couldn’t bring his dreams of changing the cooking world in his current position, Surjit continued to stay focused on his ultimate goal, working his way to Los Angeles in just under five years, where he became Vice President of Engineering & Research & Development for U.S. Range. It was this move that would play an integral role in shaping Surjit’s future, as it was here Surjit met an individual by the name of Fred Carl. Carl came to Surjit seeking someone to help him create a commercial style range for home use – a goal that up until now, no other manufacturers had been able to accomplish – and Surjit immediately jumped at the chance. In 1986, Surjit’s work was completed, and Viking Ranges was born.
Not content merely creating the world’s first commercial style home range, Surjit again branched out, leaving U.S. Range in 1988 and taking several other employees with him – specifically, Roberto Bernal, an engineer; Raul Chita, purchasing manager; Porfirio Guzman, production scheduler; Rafael Romero, a project engineer; and Alejandro Bernal, a plant and production engineer. Together, they formed Dynamic Cooking Systems (more commonly known as DCS), a company that would become not only one of the world’s leading manufacturer’s of professional quality gas ranges for the home, but also the world’s first company to create an all stainless steel barbecue. Needless to say, DCS noted tremendous success, becoming the preferred original equipment manufacturer for numerous private labeled industry leaders including GE, Jennair, Thermador, William Sonoma and racking up over $100 million in sales over the next 12 years.
It was during this time that Surjit’s son, Rich Kalsi, joined DCS, and it was also this time during which Surjit made Roberto Bernal and another engineer his equal partners, with each owning 1/3rd of DCS shares. As with all good stories, however, things took a twist for Surjit, as during the peak of DCS’s success, his partners voted to sell the company without his consent, not only forcing him to give up the company, but also forcing him to sign a non-compete agreement for the next five years. Following the conclusion of the DCS sale, Surjit’s partner Roberto was let go, and Surjit was forced out soon after.
Out of fear of losing their jobs as well, the key employees that helped found DCS – Raul Chita, Rafael Romero, Porfirio Guzman and Alejandro Bernal – along with Surjit’s son Rich, all decided to leave DCS, creating Capital Cooking Equipment Inc. in 2001. With Surjit and Roberto sidelined due to their non-compete agreement, Capital Cooking was led by Rich Kalsi, until in 2004 DCS was again sold, freeing Surjit and Roberto from their non-compete agreement and allowing them to join Capital. Capital’s Board of Directors immediately moved to invite Surjit and Roberto to become partners in Capital, and after doing so, Surjit was elected Chairman/CEO and President of Capital Cooking while Roberto was elected Co-Chairman.
Going back to his engineering roots, Surjit immediately began redesigning the off-the-shelf sealed burner system that Capital was buying from Germany at the time, creating a new sealed burner system significantly better than any other sealed burner on the market – the burners that power Capital’s Precision line. From there, Capital has continued revolutionizing the home cooking world, creating the open burner Culinarian series of ranges – ranges that, as I’ve already detailed, absolutely redefine the idea of performance in the kitchen. Of course, it’s not really surprising considering they’re created by the same individual responsible for bringing the concept of professional cooking in the home to reality more than 20 years ago.
But as impressive as the story is, what makes the story so great is the man himself.
Despite his numerous successes, despite his innovations, despite his accolades, Surjit Kalsi is without question the most passionate man in the home culinary world. I can tell you this because I’ve spoken to him, not for the sake of this article, but as a customer. I spent a tremendous amount of time researching ranges in search of the one that best exemplified professional cooking in the home, and surprisingly, when I went to Capital with my questions, it was Surjit himself that answered my questions. It was Surjit that detailed the history of Capital, the intricacies of the Culinarian, and what sets Capital apart from every other range manufacturer on the planet. It’s a a level of passion unlike any I’ve witnessed from a company’s CEO, and I truly believe it is Surjit’s passion that’s the key reason Capital leads the professional home cooking market.
Capital Culinarian Conclusion
If you haven’t already guessed, I’m in love with my new Capital Culinarian. Simply put, it redefines what’s possible in home cooking, bringing a level of performance rivaling that of a commercial range to the home chef. Not only is there not a better professional home range on the market, there’s not a professional home range that comes anywhere close to matching the Capital Culinarian’s performance, functionality or design. If you’re even remotely considering a new range, you absolutely have to put the Capital Culinarian at the top of your list. It is, for all intents and purposes, the perfect home range.
You can learn more about the Capital Culinarian at the official Capital Cooking website, including a detailed look at the available sizes and cooktop configurations. There’s also a color chart available showing the numerous color choices available, should you wish to depart from the more traditional all stainless steel design. And finally, for an in-depth at my personal 60″ Capital Culinarian CGSR604GB2, check out the huge photo gallery below to see what makes the Culinarian so special.
Capital Connoisseurian Range
The Capital Connoisseurian is both beautiful and functional, boasting performance that can rival even commercial ranges
Despite our best intentions, there are few purchases that, to any lasting degree, ever really change our lives for the better. The latest phone, a newer television, the cutting edge fashion trend – all provide instantaneous gratification, but their usefullness is short lived, and within a relatively short time period they will all fade away, only to be replaced by a newer, better counterpart. It’s rare to find things that endure – things that have the power to improve our lives in a meaningful way on a continual, steadfast basis.
Ten years ago I wrote an article about the Capital Culinarian range, and at the time, I had no idea how I would feel about it a year later, or two, or three. I knew at the time I made the right choice selecting the Capital Culinarian for my home kitchen, but I’ve learned that it takes time to truly appreciate the value of an object. Love isn’t born in a day – it takes time to forge an enduring relationship with something. And I can tell you that looking back, I had no idea how much joy the Capital range would bring me over the next ten years.
The Capital Culinarian has become unequivocally one of the greatest purchases I have ever made, not just in terms of my kitchen, but of anything I’ve bought, period.
The Capital Culinarian has become unequivocally one of the greatest purchases I have ever made, not just in terms of my kitchen, but of anything I’ve bought, period. I’ve used it almost daily for what is now ten years, and despite a decade of cooking, it looks nearly new, it performs as perfectly as it did the day I first used it, and together with my family, the meals we have prepared with it have been absolutely magical. It has become not only the heart of the kitchen, but really the heart of the home.

Capital Culinarian
But as with any good story, there needs to be a plot twist. This year has been a year of transition for me and my family, and we’ve decided to sell our home, and with it, my beloved Capital Culinarian. Not to sound overly dramatic, but I feel genuine sadness leaving my Capital range behind. It’s rare for me to form attachments to material possessions, but after countless morning breakfasts with the kids, family Thanksgivings spent around the stove with everyone preparing their favorite dishes, and date nights with my wife sharing a bottle of wine as we experiment with new recipes, I can tell you that of anything in my home, I will miss my Culinarian the most.
And while you may think that’s the end of the story and my love affair with Capital is over – that I’ve moved on to find a newer, better range manufacturer – the truth is, there isn’t one. Ten years later, Capital is the still the king of professional home ranges, which is precisely why after moving into my new home I immediately made the decision to purchase another Capital range – specifically, a 60″ Capital Connoisseurian. After taking delivery and firing it up for the first time, I can tell you Capital’s quality and performance hasn’t missed a beat. Fit and finish are perfect, performance is unrivaled, and build quality is exemplary. It’s precisely what I’ve come to know and love about the Capital brand.
Capital Connoisseurian Quick Look
So why did I choose the Capital Connoisseurian? I’m going to be writing a dedicated article highlighting all of the Capital Connoisseurian’s features in the coming weeks along with an in-depth review, but here’ a quick snapshot of why I chose it. For me, professional quality is the singular greatest attribute I look for in a home range. The ability to cook with the highest possible heat down to a gentle simmer is the key to prepare virtually any dish, and when it comes to heating, there’s no greater range on the planet than the Capital Culinarian and Connoisseurian. Both ranges feature open burners boasting an industry leading 25,000 BTU’s, but they’re also both capable of achieving a true simmer, meaning you can stir fry with a wok or sear the perfect steak, then turn down the burners to make a delicate French sauce, all from the same burners. After using them for the last 10 years, Capital’s open burners are simply incredible, and functionally they can rival the performance of any commercial range.
So why the Connoisseurian instead of the Culinarian? While the two share identical cooktops, including burners, griddle and grill, the difference between the two lies in the ovens. Whereas my former Culinarian was purely a gas range, meaning the cooktop and oven were all gas powered, the Connoisseurian is a dual fuel range, meaning the cooktop is powered by gas, but the two ovens are both electric. Gas ovens tend to produce a moister heat which favors dishes that you want to stay moist, like meats. Electric ovens produce a drier heat which tends to favor baked goods, like breads. As an avid home baker who enjoys baking bread on a regular basis, I decided to opt for the electric oven Connoisseurian model, but that being said, I loved my Culinarian’s gas oven – I very much could have purchased another Culinarian and been perfectly happy, and I’ve loved its results for conventional baked goods, including bread.
Capital’s open burners are simply incredible, and functionally they can rival the performance of any commercial range
Functionality aside, the second reason I chose Capital is because I absolutely love the design and engineering of Capital ranges. I’ve looked at Wolf, Bluestar, and Viking, to name a few, and the Capital Connoisseurian is unmatched in terms of build quality. Every part of it feels solid, like it’s built to last forever, and just like my Culinarian, my new Connoisseurian was engineered perfectly. Every weld, every piece of metal, is flawless. I’ve yet to find a range that rivals the quality of my Capital, and I’ve looked at all of them. Put it all together – performance, design, and engineering – and Capital has no rival.
Like I said, I’m going to be providing a follow up article providing an in-depth look at the Capital Connoisseurian and its many features in the near future, but if you’re in the market for a professional home range right now, put Capital at the top of your list, period. For anyone serious about cooking at the highest possible level, Capital is the foremost brand bringing commercial style cooking into the residential kitchen, and it looks superb doing it.
The Story of Capital and Superior Equipment Solutions
If you read my last article about the Capital Culinarian, you read the history of Capital ranges, and how industry veteran Surjit Kalsi helped launch the company after pioneering the first commercial style home range at Viking and later helping found DCS ranges. Much has changed since my first article, as Capital has since been acquired by Superior Equipment Solutions (SES), a world leader in both the residential and commercial appliance market. Led by Jeff Bernstein, SES owns numerous brands in the home and commercial appliance sector, starting with the Alfresco and Artisan line of residential outdoor kitchen appliances. Launched in 1999, Alfreso was started by Jeff along with Jeff Elliott and Edwin Hovsepian, who prior to starting Alfresco had more than 30 years of combined experience in the commercial appliance industry. Together, the trio envisioned bringing an entirely new level of quality, performance and luxury to outdoor kitchen appliances, and they’ve since grown to become a world leader in outdoor kitchen design and performance, working with world renowned chefs including Jean George, Wolfgang Puck, Emeril Lagasse and Mario Batali.
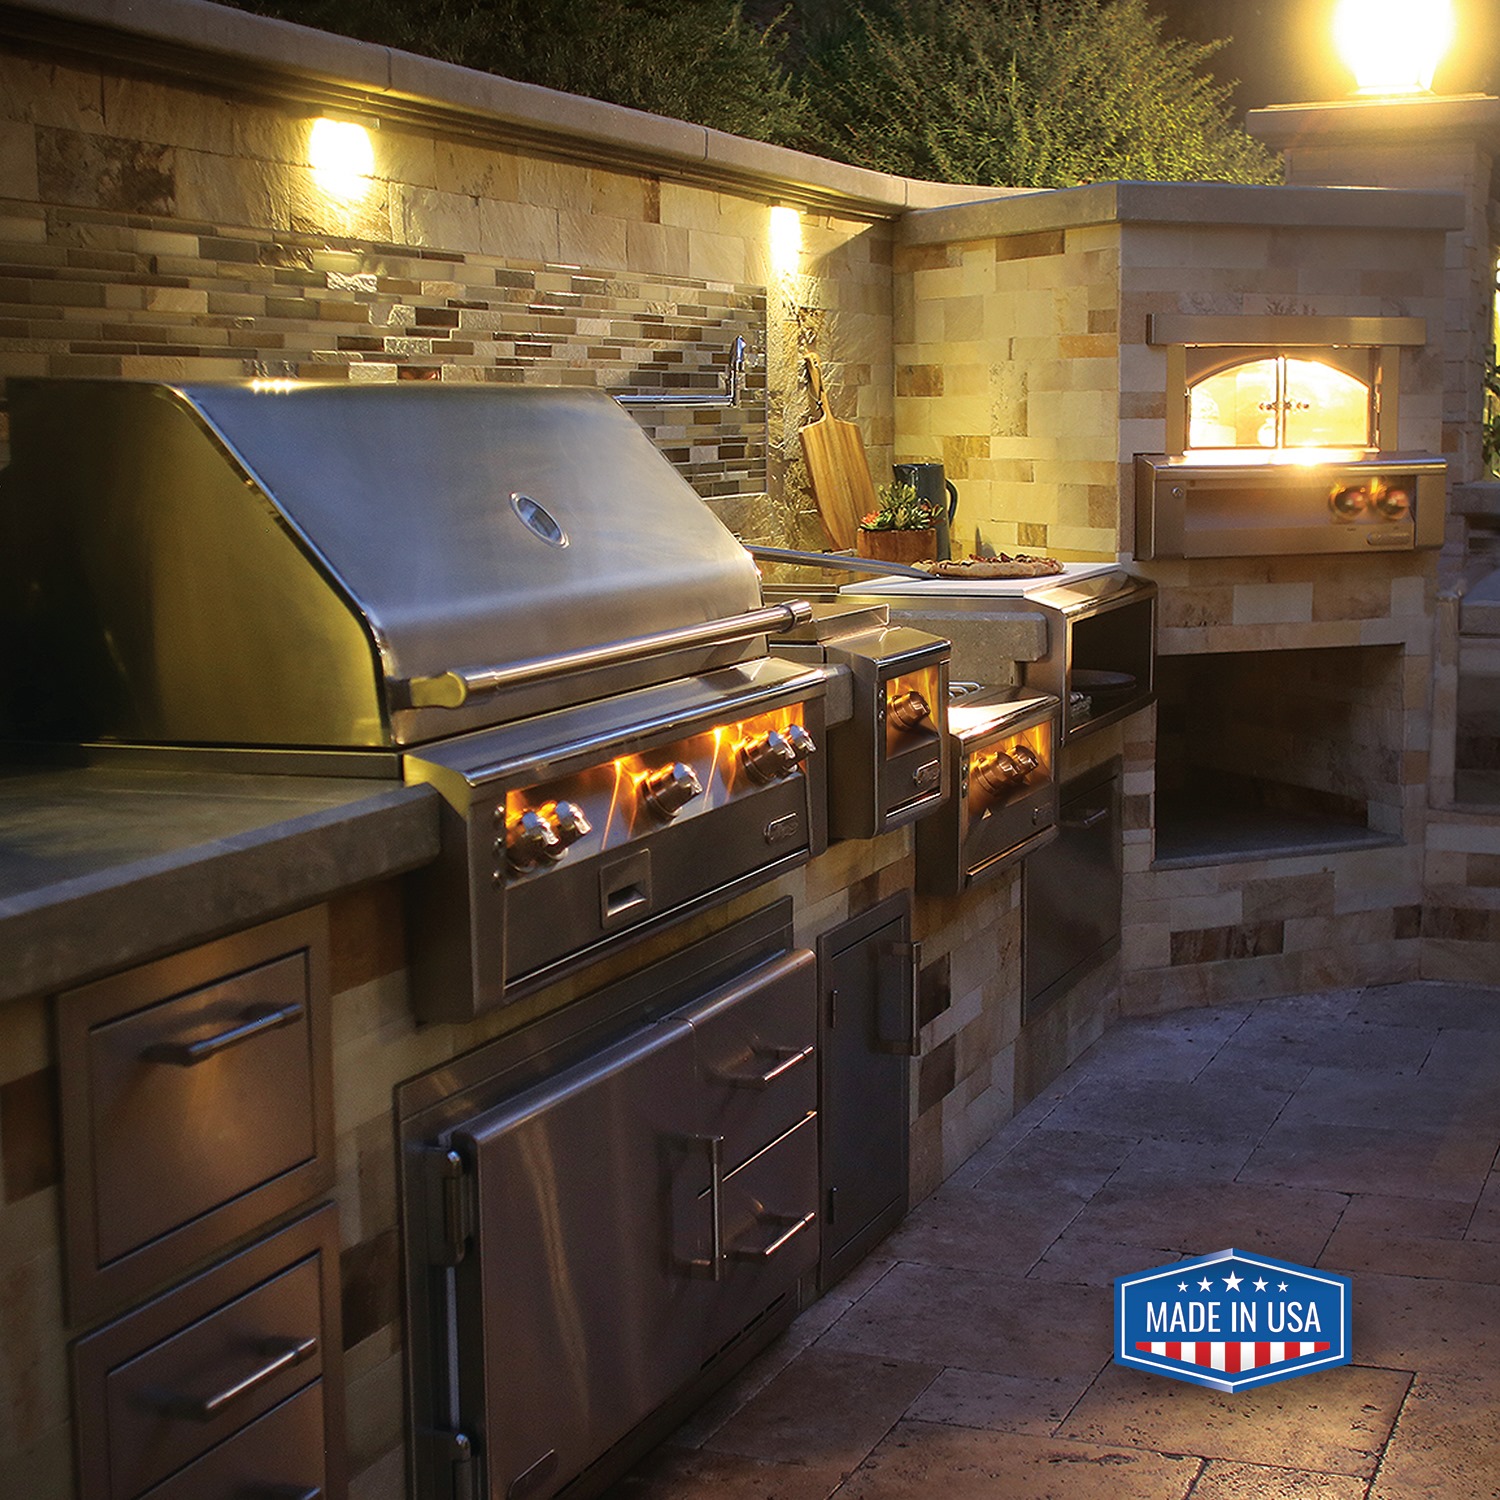
Alfresco Grills Outdoor Kitchen
I’m a huge fan of Alfresco and their lineup of outdoor kitchen appliances, and I’ll be talking more about them in a separate article, but from there, the company expanded to become what is now SES brands, after acquiring numerous leaders in the commercial appliance market. Penguin Refrigeration, Adamation Innovative Warewashing Solutions and Acme Pizza and Baking Equipment are all under the SES brand family, and they all highlight the company’s skill in engineering equipment designed to excel in a commercial kitchen environment. In other words, despite being a residential kitchen brand, Capital is now backed by a world leading commercial appliance manufacturer, which only strengthenes its position at the top of the professional home range market.

Alfresco Grills Outdoor Pizza Oven
It wasn’t until I decided to purchase the Capital Connoisseurian that I learned of SES’s acquisition of Capital. I had reached out to the company with some questions before making my purchase, and after speaking with the company, I felt even more confident in my purchase decsion. I learned that SES was keeping production entirely in the United States at its state-of-the-art production facility in California, and I learned that SES was founded on delivering the highest level of design, engineering and performance in everything they make, which is exactly what I expected in purchasing the Connoisseurian. I reached out SES CEO Jeff Bernstein before writing this article, and I asked him some questions about his company and his acquistion of Capital.
Here’s what he had to say.
Me: Tell us a bit about your background in the commercial kitchen sector and what led you to pioneer the concept of bringing restaurant quality kitchen appliances to outdoor spaces.
Jeff: The executives that make up the backbone of SES have all been in the business for over 30 years. All had previously worked with my father’s old company Jade Range (currently a Middleby Co.), which was a pioneer in the commercial exhibition kitchen concept – when the celebrity chef was just coming out of the kitchen.
Me: How has your prior experience in the commercial food service industry aided your ability to design and innovate products that are industry leaders in each of their market segments, and what are some of the key characteristics that both residential and commercial appliances should share?
Jeff: Whether it be commercial or residential, the kitchen is supposed to be designed for efficiency and flexibility. In the commercial environment space is always a premium, so function must prevail, and this is the concept we brought to the residential market. When we began people basically put freestanding grills on their patios, but originating from Southern California we began promoting the concept of an outdoor kitchen utilizing the premise of commercial kitchen as our guide. Many new and exciting products came out of this which have since become industry standards, i.e., the trash chute, dry storage pantry, drawers and bottle openers, just to name a few. A commercial kitchen is designed to take a veritable beating and our products are designed for the vigorous standard.
Me: After launching the Alfresco brand, you’ve since expanded into numerous other sectors with the Artisan, Penguin, Acme, Adamation and Capital brands, targeting both residential and commercial industries. Has this marriage of numerous companies under the SES brand made design and manufacturing easier (i.e., does it allow crossover among your R&D, manufacturing, technology, etc.), and has this positively impacted your residential brands?
Jeff: All of our knowledge helps us to be a better manufacturer and ACME & Adamation are companies with both over 80 years in the commercial industry. Penguin, which is our commercial refrigeration division, works with restaurant chains, and we also OEM for an established range manufacturer. This allows us to do some innovative products with our Alfresco line since we make it ourselves, like our 42” under grill refrigerator ARXE-42 with a door & 2 refrigerated drawers – this is the only one of its kind on the market.
Me: SES has chosen to invest substantially into advance automated technology and design programs, thus keeping manufacturing in the U.S.. Why was it important to you to keep design and manufacturing in the U.S. and what benefits does it provide to your customers?
Jeff: Automation allows us and the customer several benefits. First, there is a greater consistency in the accuracy of the parts produced. Human error is eliminated, thus reducing problems and also providing a higher quality. Our concept has always been to build quality in not inspect it as it goes out. We can also run a substantial part of the manufacturing process lights out which allows us to keep our lead times short and creates less of a panic so quality remains high.
Me: The founders of Alfresco have a background not only in commercial kitchen appliances but also in commercial kitchen design and space planning. How important is design in ensuring the most functional outdoor kitchen space possible and what are the benefits of having an outdoor kitchen space designed by your team of experts?
Jeff: Yes, we have always know that an efficient kitchen would be beneficial, so several years ago we started the process of offering a free 3D drawing and level out of a customers intended space – these have also become the standard in the industry.
Me: SES, through its Alfresco and Artisan brands, has been designing and manufacturing outdoor kitchen appliances that are the best in the industry, and you’ve also led the way in appliance innovations with numerous offerings that were firsts in the industry. With such success in the outdoor market, what made SES decide it was time to look to indoor appliances and why Capital Cooking?
Jeff: We have wanted to move back into the indoor market for a long time and had been working on designing a commercial style range under the Alfresco brand, but several years ago we started to have discussions with the Capital people, and finally the right opportunity arose.
Stay tuned in the coming weeks as I detail both my Capital Connoisseurian and the Alfresco lineup of outdoor kitchen appliances, and be sure to check out the official websites for both Capital Cooking and Alfresco while you wait. And a special thanks to Jeff for taking the time to answer my questions and giving us a deeper look at SES brands.
Christmas Gift Guide: The Home Chef
Here are some gifts for the foodies among you, all of which are sure to garner your loved one's love and praise
Not only is Christmas a time for gifts, it’s a time to indulge in culinary bliss. For those of you who, like me, are blessed with an incredible home chef (a.k.a., my wife), here are some gifts for the foodies among you, all of which are sure to garner your loved one’s love and praise (while helping you continue to reap the rewards of their kitchen mastery).
Ruffoni Historia Copper Cookware Set
Do not be fooled by imitators, the only copper cookware under your tree this Christmas should be direct from the Italian Alps from the family-owned atelier, Ruffoni. The Ruffoni family has made hand hammered professionall copper cook ware for decades and have combined their passion for craftsmanship and technology into the creation of hand-worked copper cookware. There is simply nothing else like it and the Historia Collection is, in my opinion, the shining example of their extraordinary craftsmanship and attention to detail. If you have a chef in your life or someone that just appreciates beauty, the Ruffoni Historia Collection is easily at the top of their Christmas list. $2,000+

Ruffoni Historia
Global GF Knives
Chefs will agree that when it comes to slicing and dicing, you are only as good as your knives, so consider the gift of razor sharp perfection this Christmas. Global knives are made from the finest stainless steel material, Ice tempered and then hardened to Rockwell C56°-58° – this ensures a long-lasting razor sharp edge. Imported from Japan, Global Knives, like the Samurai swords before them, are carefully weighted to ensure perfect balance in the hand, making it an extension of the cook. I’d recommend gifting a full set but if you can only give one this Christmas, start with a Chef’s knife. $150+

Global GF Knives
Vitamix Professional Series 750
Give the gift of not only the most versatile kitchen appliance but one that promotes better health. There are several Vitamix options to choose from but why not choose the best. The Professional Series 750 is a combination of pro quality and power but with none of the noise and even better looking. There are five pre-programmed settings, including a self-cleaning option and a Variable Speed Dial and Pulse feature to allow you to precisely chop and mix ingredients to your exact specifications, making this blender the ultimate sous chef for your home kitchen. This is one gift you can give with confidence and without a gift receipt this year. $639

Vitamix
John Boos Tenmoku Cutting Board
John Boos is known for their functionally beautiful cutting boards and no gift list, or kitchen, is complete without them. As far as choosing which Boos Block is right for you or for your gift recipient, it’s not easy as there are so many pieces to love. The Tenmoku Cutting Boards area good start however and come in sizes perfect for the smallest kitchens to the largest. Named after an ancient tenmoku glase used in asian pottery, the U.S. made cutting boards come in either Hard Rock Maple or American Black Walnut and colors similar to those of tenmoku pottery. The indented juice groove is designed to resemble the tenmoku tea bowls and will hold liquid until poured off. $139+

Boos Block
Lodge Cast Iron Skillet
The absolute most versatile piece of cookware in the kitchen is a cast iron skillet, and they don’t get better than those made by Lodge. We love the Lodge 12-inch skillet – it’s the perfect size for almost anything you’re cooking, from eggs and bacon to a whole chicken. With proper seasoning, they’re naturally non-stick; you can use them both on the stove or in the oven; and if you take care of it, it will outlive you. Best of all, they’re made entirely in the U.S.A.. $35

Lodge Cast Iron Skillet
Marvin Windows and Doors
Marvin redefines what windows can be, setting a new standard for design customization and energy efficiency
Since meeting my husband more than 10 years ago, we’ve lived in several houses in different parts of the country, all of which were pre-existing homes. The thing is, despite living in them and despite each being beautiful in its own right, we never truly loved any of them, as they lacked a certain character. More precisely, each of the houses fit someone else’s vision at the time they were built, but they didn’t fit my family’s. It wasn’t until we found our current house that we truly fell in love with a home. It wasn’t, however, love at first sight. Instead, it was the vision of what it could be that we fell in love with.
With our prior houses, all were modern and either newly or close to newly built. With our current home, however, the house was older and in need of serious work when we stumbled upon it. And that was the beauty of it. Unlike a new house where the main design choice is what wall color you’re going to paint, we looked at this house as though it were a blank canvas that we could impart our own style upon from the ground up. As a serious foodie and avid home chef, the room that has always been at the top of my list to renovate was the kitchen, and we’re finally in the midst of doing exactly that. In designing the kitchen, one of the main design elements we had to consider was how to let as much light into the room as possible. This means (if you haven’t already guessed) that one of the biggest decisions we had to make was selecting new windows – both a brand and a specific style.
In researching windows, we quickly discovered how vast the options were. We looked at home magazines and different architects for inspiration; then we went to different stores to see the windows in person. But during our research phase, despite there being a huge variety of brands to choose from, we quickly discovered there was a certain boringness to the majority of windows we looked at. It’s amazing really, because windows play one of the biggest design roles in a house, both from the outside and the inside.
For us, this quickly became a determining factor in the brand we picked, as we not only were planning windows for our kitchen, but also throughout the rest of our home. We wanted windows that reflected our character and personality and allowed us to be flexible in the designs we chose. And that’s when we visited our first Marvin showroom. Unlike the other window manufacturers that noted simple, very basic designs, the design consultant at the Marvin showroom directed us to the Marvin.com inspiration gallery, which is basically a collection of different windows and styles that have been incorporated by a variety of designers, architects and artists. The range of windows was simply leaps and bounds ahead of anyone else, with styles from traditional to art deco to victorian all showing off the myriad of ways windows can be incorporated and the different look and feel that each creates.
Marvin gave us the confidence that no matter what design we chose, both in the kitchen and in future rooms in our home, they would be able to match exactly the style we were looking for.

Style wasn’t the only thing that made us choose Marvin Windows, however; after talking with the Marvin design consultant, we discovered there’s a long list of attributes that sets Marvin apart from not only their competition but from most businesses in general. Here are just a few.
To start, Marvin windows are “built around you”, which means every window is made once you order it, ensuring the absolute highest level of quality. Marvin doesn’t specialize in building one-size-fits-all windows in bulk; they specialize in building custom ordered windows in different sizes and shapes every single day. As our Marvin design specialist said, if you’re concerned that a custom order may be beyond the scope of the company, don’t be. Custom is what Marvin does. There are literally thousands of standard window options, seven interior wood species, nineteen clad color options and limitless divider options. If, by chance, there’s a different window design they haven’t already created, Marvin will work with you to make it a reality. And because they do it day -in and day-out, you can rest assured the quality of every window you buy will be up to Marvin’s exacting quality standards.
Speaking of quality, Marvin windows note what I’ve found to be simply beautiful craftsmanship. Built from solid wood throughout and extruded aluminum cladding on the outside, Marvin windows are are able to stand up to even the most extreme climates. This was a huge factor for us because our home is in the Midwest – we needed windows that could stand up to extreme cold, with temperatures sometimes going below zero in the winter, while still keeping the heat out during hot and humid summers. Because of their build quality, Marvin windows’ cladding is strong enough and durable enough to handle these fluctuations without any fading or cracking of the paint color, which ensures they’ll look like new for years to come.
As for energy efficiency, Marvin offers 150,000 different energy efficient options to fit your home’s climate, because what’s great for a home in the Midwest isn’t what’s great for a home in the South. It’s just another example of how Marvin customizes windows to your needs. They work with you to find what is right for your climate using easy to understand ratings including the EPA’s Energy Star rating, U-Factor, Solar Heat Gain Coefficient, and Design Pressure Rating. Some of the options you can choose from include selecting dual or triple glaze with two or three panes of glass or suspended film; insulating glass coatings that uses transparent LoE glazing to block out heat; and insulating gas options that can significantly lower the U-Factor. Our Marvin design specialist explained each to us and gave us his recommendation, which made it remarkably simple to find windows that matched what we were looking for in terms of performance. The best part, however, is that no matter what energy saving options you select, the beauty of Marvin windows stays the same.

In addition to the windows themselves, the final thing that drew us to Marvin was the company’s production standards. As we came to learn, Marvin Windows and Doors is a leader in green manufacturing, making every effort to produce the highest quality window with the smallest impact on the environment. Numerous materials in Marvin windows and doors are produced from recycled materials; wood used in Marvin’s products is harvested from responsibly managed forests; and excess materials in Marvin’s plants are used to help power the facilities. There’s more, but these are just some of the ways Marvin is setting an example of how companies can set a new benchmark for green production. Best of all, every Marvin window and door is produced in the United States, with Marvin boasting five manufacturing facilities and over 4,500 employees.
So which Marvin windows did we pick? For our kitchen remodel, we selected two sets of Marvin Ultimate Casement Windows (each containing three windows). And while I’m going to cover the Ultimate Casements in a separate article along with my complete thoughts on them, I can tell you now they’re simply the best casement windows I’ve ever used. They look beautiful, they’re energy efficient, and they’re incredibly easy to clean, thanks to Marvin’s engineering ingenuity. Most importantly, however, is they gave my home a character that’s fitting of me and my family, and the perfect compliment to my new kitchen design.
Stay tuned for my second article looking at my specific Marvin windows, but until them, take some time to look at the photo gallery below and the range of window solutions Marvin offers. It’s easy to envision what a difference even a single window could make in your favorite room in the house, whether it’s brightening it up or letting your own personality be perfectly reflected. Once you’ve made your way through the gallery I highly recommend checking out the winner’s gallery from the Marvin 2014 Architects Challenge to see even more amazing ways that something as simple as a window can change the look and feel of even the most grand estates.
Electrolux French Door Refrigerator and Refrigerator Drawers
The Electrolux French Door Refrigerator with Wave Touch Controls is designed to fit your family's needs perfectly
Whether you’re undergoing a complete kitchen remodel, building a new home or just upgrading your appliances, one of the main decisions you’ll have to make is what refrigerator fits your kitchen needs the best. There are side-by-side models, french door models or single-door refrigerator and freezers. Then there’s the option of including an ice maker (or not) and picking either standard-depth or counter-depth. For my kitchen remodel, I chose to go with a french-door refrigerator with the freezer drawer located at the bottom, ice maker on the exterior and a counter-depth design. Specifically, the exact refrigerator I went with was the Electrolux Couner-Depth French Door Refrigerator with Wave Touch Controls – the perfect compliment to my other Electrolux appliances that I already have installed and one that fits the needs of my family perfectly.

Electrolux Couner-Depth French Door Refrigerator with Wave Touch Controls
Paired with the counter-depth Electrolux French Door Refrigerator, I also opted to install Electrolux Refrigerator drawers, giving me additional space to keep food and drinks cool and also making them more accessible to myself and kids.
If you’re a regular reader of eMercedesBenz, then you already know that we’ve detailed extensively our experiences with Electrolux and why we chose them for our kitchen remodels. Putting it simply, our experience with Electrolux has shown them to be among the most reliable, functional and stylish appliances on the market – and even more of a standout for their price point. I couldn’t be happier with my full lineup of Electrolux appliances, and I’ve yet to find a feature that I wish they had.
With that said, let me then explain why I chose a French Door Refrigerator over the other styles and also discuss the benefits that appealed most to me. First up: entertaining. I entertain often, and regularly have platters of food, cakes, etc. that need to be kept cool. Thanks to its French door design, the Electrolux French Door Refrigerator is wider than my widest platter (which makes keeping larger items cool a breeze), and the glass shelves are easily adjustable or removable to fit my tallest of cakes. And speaking of the glass shelves, I’ve also come to love that all of my food is easily seen and accessible, and when you add in the integrated LED lighting, I can see exactly what I have in an instant (meaning no more forgotten and wasted food).

Electrolux Couner-Depth French Door Refrigerator with Wave Touch Controls
In addition to the wide refrigerator up top, the bottom freezer is also a highlight of the French door design. I’ll get into Electrolux’s layout in a bit, but functionally, a bottom freezer is again ideal for my needs. I can lay half sheet pans down completely flat; I have room for a full turkey when I need to; and because everything is more visible thanks to its full pull-out shelves, I don’t have to spend nearly as much time with the freezer door open searching up and down for whatever it is I’m looking for. For anyone on the fence as to whether or not the French door design is right for them, I can tell you that for me, it’s a huge step up over a conventional side-by-side, and I don’t think I could ever go back.
Which brings us to the ice maker. Having children, choosing to have an ice maker and water dispenser on the exterior of the fridge wasn’t even a question. We’re constantly filling up drinks throughout the day, so not having to open and close the doors every time we need a refill is not only quicker for us but also saves energy. In addition to the external ice maker, there’s also a built in ice maker in the freezer, which helps ensure you never run low on ice even when company is over. As for the quality of water and ice that comes out of your refrigerator, Electrolux uses a PureAdvantage filtration system that filters water as it’s used for fresh clean and crisp water every time. And I should also mention that in addition to the water filter, there’s also a Pure Advantage Filtration System that’s used to circulate and clean the air within the refrigerator, so that no matter what leftovers you put in last night, you will not smell it on your breakfast the next morning.

Electrolux Couner-Depth French Door Refrigerator with Wave Touch Controls
When it comes to interior design of the Electrolux French Door Refrigerator, Electrolux truly thought of everything. When you pull the Luxury Glide Freezer Drawer out, you are met with racks that allow you to easily view different levels of food, eliminating huge piles of food to dig through. There are also seperators that you can choose to use and move where they’re needed. In my case, I have sections for frozen meats, fruits and vegetables. For frozen pizzas, I take advantage of the built in storage along the backside of the door where they easily slide in and out. Also in the freezer is a soft freeze bin for things you want kept frozen but still soft enough to use without having to thaw first – foods like ice cream, butter, etc.
The refrigerator portion up top is equally well thought out and even more customizable. As I mentioned earlier, the glass shelves are easily removable and can be put back in to give you the exact height that fits your needs the best. The two sections with self-closing drawers can be independently set to control the humidity for keeping fruits and vegetable fresher longer. The extra wide Perfect Temp Drawer spans the entire width of the refrigerator and can be set to its own temperature independent of the rest of the refrigerator. You can choose any temperature ranging from 28-42 degrees or use one of the presets. Along the inside of the door are also customizable storage containers that can be adjusted based on the height of it’s contents. Overall, it’s an incredibly functional and well-thought interior, both for storing food effectively and keeping it as fresh as possible.

Electrolux Couner-Depth French Door Refrigerator with Wave Touch Controls
As you can tell, choosing the Electrolux French Door Refrigerator was the right option for me, which brings us to the choice of counter-depth or standard-depth. For those of you that didn’t realize there even was an option here, let me explain. A counter-depth refrigerator means that the actual unit is in most cases the depth of the counter with the doors sticking out slightly to allow for the hinges to swing freely. My Electrolux counter-depth refrigerator is 28 1/2″ deep, perfect for my 25 1/2″ deep countertops. It gives the look of a built in refrigerator without the price tag or the installation hassle.
A standard-depth refrigerator is just that – it is the standard size refrigerator that we’ve become accustomed to. The Electrolux Standard-depth French-Door Refrigerator (which I also considered) is 33 3/8″ deep, almost a full 5 inches deeper than the counter-depth. If you’re looking for the largest amount of storage space possible and door clearance isn’t an issue, then this is a perfect option. It comes with all the same features I described above, in a deeper design. In my kitchen, I opted for the counter depth refrigerator due to its placement in my kitchen. I didn’t quite have room for the standard depth refrigerator, so I opted for the counter depth, adding in additional refrigeration with Electrolux refrigeration drawers in my kitchen island.

Electrolux Refrigerator Drawers
And speaking of the Electrolux Refrigerator Drawers, these too are a great addition for a huge variety of kitchens. One of my favorite things to use them for is beverages, especially when entertaining, as they can hold a large amount of drinks (including two-liter bottles upright). Setting the temperature on the drawers is super simple, thanks to the integrated digital temperature control on the top drawer, which allows you to set a temperature anywhere between 34 and 45 degrees Fahrenheit. I also love the door ajar warning, which alerts me anytime my kids don’t fully close the doors. The biggest advantage to the Refrigerator Drawers, however, is your ability to place them anywhere you want. It’s so much simpler cooking having the refrigerator drawers within reach, as I can keep many of my most used food items close at hand. This saves numerous trips to the refrigerator, and makes the entire cooking process so much quicker and more enjoyable. Paired with my Electrolux French Door Refrigerator, it’s a match made in heaven.
So that’s my experience with picking a refrigerator, and hopefully you’ll find it helpful if (or when) you’re considering your own kitchen renovation. I can’t say enough good things about all of my Electrolux appliances, and the Electrolux Refrigerator and Drawers were really the perfect finish to the other Electrolux appliances that I’ve already come to love.
Nespresso Lattissima Touch
Eighty-three percent of Americans drink it, $30 billion-a-year is spent on it and my day doesn’t start without it - Coffee
Eighty-three percent of Americans drink it, $30 billion-a-year is spent on it and my day doesn’t start without it. The incredibly delicious drink of which I speak is, if you haven’t already guessed, coffee. We have become unequivocally a coffee loving culture, and the best part of waking up is no longer a stale dark roast hiding in your cupboard. Coffee has become an art form, with such a huge and varied assortment of options it’s nearly impossible to count them all.
One company that has by all accounts taken the coffee lover’s world by storm is Nespresso, a brand built around the idea of giving everyone the ability to create the perfect cup of espresso coffee at home, cup after cup. They’ve taken the guesswork out of bean selection, roasting options, water temperature, brew time etc., and given the world a straightforward way of customizing their perfect cup by simply selecting a capsule. Select a capsule, press a button, and you have incredibly great coffee or espresso, time after time.

Nespresso Lattissima Touch
There are numerous Nespresso machines to choose from in a variety of styles and colors, but the machine I chose was the Nespresso Lattissima Touch, and I simply adore it. I was first introduced to Nespresso in multiple luxury hotels I stayed at, and upon trying it for the first time, was immediately amazed at the ease and convenience of it. The machine heats up in a mere 25 seconds, during which you select your favorite Nespresso coffee capsule, and the coffee itself is made with a single touch of a button. Choose either the Ristretto (.84 oz), Espresso (1.356 oz) or Lungo (3.72 oz) buttons for the corresponding coffee size without milk, or select either the Cappuccino or Latte sizes for Nespresso’s preset coffee with milk settings. For more customization you can also select one of the three coffee settings, then manually select the amount of milk you’d like as well. Additionally, to further customize your cup, you can change the milk froth texture regulator to further suit your tastes and vary the foam consistency.
And while the process of making coffee is both simple and unbelievably fast, the process of selecting a coffee is equally as intelligent, accomplished by picking from one of Nespresso’s many available capsules. Choose by flavor, intensity, origin, or other options, and you’re guaranteed the perfect cup of coffee every time. And while Nespresso’s many options may seem daunting, I would suggest starting with a sample pack, giving you a chance to try a wide variety of roasts, from light to dark, fruity to nutty. If you already know what you like, Nespresso has an easy to navigate filtering system that lets you narrow your options down by intensity, tasting mode (ristretto to Lungo) and aromatic profile.

Nespresso Lattissima Touch
Once you’ve made your coffee, cleanup is equally as easy, with no messy coffee grounds or filters to deal with. Open the capsule lever and the capsule is dropped into a holder that can be emptied at a later date, no need to scrub or wash out as grounds are contained within the original capsule. Any leftover milk can be stored in the frothing container and refrigerated for future use. And as an added bonus, the machine automatically powers off as well, saving energy.
As for whether or not the Lattissima Touch will fit your kitchen’s design, the lines are simple and clean with the finishing options in black titanium or palladium silver (my choice), making it at home in anything from classic to the most modern of kitchens. The footprint of the machine is also quite small, so if you do choose to hide it away or you live in the city with a small kitchen, it a perfect option, as it takes up very little space.

Nespresso Lattissima Touch
If you, like me, are looking for the fastest and easiest way to make great coffee, you can pick up the Nespresso Lattissima Touch directly from Nespresso along with their full line of capsules. I’d recommend ordering the Indulgent Pack initially in order to try the full range of Nespresso capsules. Also, after my own bit of research, Nespresso offers the best prices for the capsules by buying direct, so be careful not to overpay when shopping at third party sellers.
*I am not being paid by Nespresso or partnered with them in any way.
All Wood Cabinetry – Your Dream Kitchen Imagined
All Wood Cabinetry simplifies the process of remodeling the kitchen saving you time and money
Thanksgiving is over, and unless you’ve updated your kitchen in the last ten years, or convinced a relative to host the holiday, you probably swore to yourself that you would never again cook for company again. But it doesn’t have to be a burden to host holidays and dinner parties – it’s actually possible to enjoy your time in the kitchen. I love cooking and I love hosting dinner parties and holiday gatherings, but my kitchen was set up in a way that segmented it from the rest of the house, meaning it was made to fit only a few people while everyone else was socializing in a separate room. It was also designed without much storage space in mind, which meant several trips to storage in other parts of the house to find my holiday platters, roaster and additional place settings.

All Wood Cabinet Design
When I started working with All Wood Cabinetry, the designer and I discussed all of the above and exactly what it was that I desired from my new kitchen. You can read more about the design process in my previous post here. And in the end, All Wood Cabinetry took the space that I had, my desires and my needs and delivered a design that offered a great looking and a functional kitchen. It’s created not only an ideal cooking space with everything I need in one place, but also a space that allows me to host friends and family in the very same room comfortably.

All Wood Cabinetry Design
What’s great about working with All Wood Cabinetry is simply the ease by which the process takes place. There were no trips back and forth to a kitchen designer; everything’s handled from the comfort of your home. Then, once you’ve finalized your design, the kitchen cabinets are delivered directly to your door (in our case, just over three full pallets worth). It’s as simple as you can get. Once the cabinets were delivered, we checked for any scratches, blemishes or missing pieces per our instructions from All Wood, with everything in our order arriving in perfect condition without any missing pieces – quite impressive considering the multi-page list cabinets and accessories.
Installation wise, whether you’re installing them yourself or you have a professional do it for you, All Wood Cabinetry is remarkably straightforward to install. Each cabinet came individually packaged and marked with dimensions, so laying out the kitchen is simply a case of matching the design drawings with the measurements on the outer cabinet boxes. Once you’ve unpacked the cabinets, you’ll be pleased to see the cabinets are all fully assembled, with sliding doors and hinges already in place. Not having to line up the drawers and hinges is a huge time saver, and a welcome sight when we unpacked the cabinets.

All Wood Cabinet Design
Adding to the ease of installation is the cabinet’s sturdy plywood construction, which made moving the cabinets easy without any fear of the cabinets bending out of shape. For our installation, we removed the drawers from the individual cabinet units (easily done via the quick release levers underneath each drawer), and screwed several cabinet units together to create three larger, one-piece cabinet units. Doing so made it simple to install our cabinets at the same level height – much easier than if we had tried to install and level each cabinet individually. Depending on the complexity of your kitchen, it’s definitely a project that you can undertake, especially if you have experience with other diy projects.
Installing the upper cabinets was no different, as each cabinet was clearly marked. Some people recommend installing the upper cabinets first and then the lowers, but in our kitchen, several of the uppers actually rest on the lowers, so for us this wasn’t an option. Like the lowers cabinets, all dimensions were perfectly accurate, and the plywood construction again ensured everything stayed square throughout the installation.

All Wood Cabinet Design
Finally, the last thing worth noting about the All Wood Cabinetry installation is the completeness of the components in addition from the cabinets themselves. Various moldings, decorative end panels, etc. are all included, helping you add the finishing touches very easily. The end panels, for example, fit into notches pre-built into the cabinets, meaning there’s no cutting or carpentry required for installation. Inside the cabinets, the various options all come pre-installed as well, such as the slider for the spice rack, waste basket containers, etc. It made installing the cabinets much simpler than we anticipated, which after going through such an extensive remodel was a very good thing.
Long story short, if you’re considering a new kitchen and wondering whether or not you can install it yourself, with All Wood Cabinetry, you can. Even if you hire a professional, you’ll likely still save money, as they’ll be able to install it much quicker than they would with other cabinet brands.
To see what All Wood Cabinetry can do for you and your dream kitchen, check out the All Wood Cabinetry website to see their range of cabinetry and to get your free kitchen design and quote. And stay tuned for our next All Wood Cabinetry article where we’ll unveil our final kitchen design.
Julien Sinks and Faucets
No other company can compare to the style, function and quality standards set by Julien
No matter what style or size kitchen you have, two staples that every kitchen needs are a faucet and a sink. The difficulty when choosing a kitchen faucet or sink, however, is despite the fact they’re two of the most used elements in the kitchen, they vary greatly when it comes to quality, style and function. I can’t tell you how long I spent researching and getting hands on with both to find the perfect combination of usability and great looks, and after a huge amount of debate, I fell in love with offerings from the brand Julien. I loved their sinks and faucets so much, in fact, that I actually altered my kitchen design, changing from only a main sink and faucet to a design that included both a main sink and prep sink with second faucet.
So what did I choose? I picked the Julien Sky Faucet, the Julien Azur Faucet, the 36-inch Cambridge Sink and the 15-inch Nantucket sink. And honestly, they’re everything I’ve dreamt of and more, blending perfectly an incredibly gorgeous style with the perfect level of functionality.

Julien Sky Faucet
Julien Faucets
Despite being one of the most used elements of the kitchen, it’s easy to overlook a faucet in your kitchen design and give precedence to the other design elements. But after suffering through numerous faucets that I hated, finding a faucet that would hold up to the rigors of everyday use was extremely important to me. Look past its functionality and the kitchen faucet can be a statement piece in your kitchen, skillfully sculpted with beautiful lines that serves as one of its key design elements. It’s this blending of functionality, quality and style that led me to choose to Julien Faucets in my dream kitchen.
Known for their long history in creating products for the commercial kitchen, Julien home products are built with that same great long lasting quality seen in their commercial products. Manufactured in either Germany or Italy out of solid brass with ceramic disc valves, they’re the most durable faucets you’ll find anywhere, boasting not only a 1 year warranty on the entire faucet, but also a lifetime warranty on the ceramic disc valve and flex hose (which are really the faucets two main functioning components).
I loved the build quality of all of Julien’s faucets, so picking which Julien faucets I wanted really came down to style. It’s no secret that kitchen styles and personal taste can vary greatly from person to person, which is why Julien carries both traditional and contemporary faucets in a variety of finishes and styles. Having worked in a commercial kitchen, I knew I wanted an oversized spray hose for ease of use, so I ultimately chose the Julien Sky Faucet in polished chrome for the main sink and the Julien Azur in polished chrome for the prep sink.
The Julien Sky faucet is absolutely stunning, noting a contemporary 27-inch tall design, a 2.2 gallon per minute flow rate and a 360 degree swivel head that flexes, allowing you to reach anywhere in your sink. It’s the perfect companion if you’re considering an oversized sink, as I did. For washing, the Sky has a dual sprayhead, allowing you to easily change between a spray jet or a stream jet depending on your needs with the push of a button – an extremely handy function when rinsing dishes. The high arch and flexible hose also allows me to fill pots while they’re sitting on the counter instead of in the sink. If you prefer to use hands free, you can keep the spray head it in its resting position and direct the water flow down, while a single lever makes controlling the heat and flow with one hand quick and easy. From a usability standpoint, it’s the most functional faucet I’ve ever used, and could easily be used in a commercial setting. But from a design standpoint, the Sky faucet is a work of art, blending seamlessly elegance and luxury in a sleek, modern design.
The Julien Azur faucet (which I’m using for my prep sink) is a smaller contemporary option, noting a 15 3/4-inch height and sleek, more minimalistic design. It too notes a 360 degree swivel spout and flexible spray hose along with a 2.2 gallon per minute flow rate. Like the Sky faucet, a single lever makes controlling the heat and flow rate a simple one handed operation, a huge plus when washing fresh fruits and veggies. And despite my use of it as a secondary faucet, the Azur could easily be used as a main faucet, as it’s still both incredibly functional and great looking.

Julien Fireclay Sink
Julien Sinks
After picking a faucet, my next task was selecting the two sinks for my kitchen. While Julien offers the most beautifully handcrafted stainless steel sinks that are equal parts art and sink, I chose a pair of Julien’s fireclay sinks after falling in love with fireclay while on vacation in Europe. Designed to last for generations, the classic fireclay sink boasts clean lines that blend perfectly into virtually any modern kitchen. I specifically chose the Cambridge X-Large, a 36-inch wide sink as my main sink, as it’s not only huge, it’s also a single basin, meaning there’s no divider to get in the way of washing larger pots and pans. This of course comes down to personal preference, but having used divided sinks in the past, I much prefer having a single larger basin as opposed to two smaller basins. For the prep sink, I chose the Nantucket Square, which as the name implies, is a convenient 15-inch square shape, the perfect size for smaller prep tasks. Both sinks are handcrafted in England and made from solid fireclay, one of the oldest materials used by man, and both are chip and scratch resistant. For added piece of mind, Julien’s fireclay sinks also carry a 10 year warranty against fading and staining issues (and a 1 year warranty against manufacturing defects), ensuring your sink will look beautiful well into the future. In my kitchen, the sinks were the perfect addition to the faucets I selected, as it brings a classic feel to the contemporary lines of the faucets, which I love.
Stay tuned as I’ll continue to discuss Julien and the other brands I’ve chosen in my kitchen, giving you an inside look at what it takes to create a dream kitchen. Until then, you can see both the faucets and sinks discussed in this article at the official Julien website.
All Wood Cabinetry – Design Your Dream Kitchen for Less
The kitchen is the heart of the home, which means when you decide to remodel, you need to ensure you do it right - the first time
The kitchen is the heart of the home, which means when you decide to remodel, you need to ensure you do it right – the first time. Unlike other rooms in your home that tend to be hidden away from guests or can easily be redesigned by shifting furniture or painting the walls, the kitchen is one of the rooms that almost everyone sees, and because it’s not modular, re-arranging your kitchen isn’t really an option. Not only that, but the kitchen is also the most expensive room in your home to remodel, which is yet another reason to make sure you get it right the first time. So why remodel your kitchen? Because if you do it right, a remodeled kitchen can not only look gorgeous, it can offer you a level of functionality that makes cooking at home a joy both for you and your entire family. Old kitchens tended to be the domain of the cook; new kitchens are the domain of the entire family. And if that isn’t enough of an incentive, a new kitchen is the single biggest way to increase the overall value of your home, which will make selling your home significantly easier down the road.
My home was built in the late ’60’s and the kitchen was updated in the late 90’s, a few years prior to when my family purchased it. There was nothing wrong with the kitchen, as it was functional and nice looking, but it just didn’t fit what I and my family envisioned. After updating numerous other rooms in the house to try to make our new house feel like our home, we were left unsatisfied as the kitchen was one the room we found ourselves in most often. After over a year of deliberation, we decided it was time to take on our kitchen remodel.
The process began by sitting down with my family and listing everything we wanted from our kitchen. Once we were in agreement, we set off on our search for brands and products that fit our wants and our budget – starting with cabinets. This was perhaps our biggest mistake initially, as a kitchen is composed of far more than just cabinets. When shopping for cabinets, we found several high-end custom cabinets that we loved and that fell within our total budget. But while they fell within our budget, they also took up all of our budget. And the real truth is that no matter how beautiful your cabinets are, if everything else doesn’t follow suit, it won’t matter who’s name is on your cabinets. So, before signing off on our high end cabinets, we looked at the other kitchen pieces and their cost including countertops, appliances, flooring, windows, lighting and hardware. Once we added it all up along with installation and construction costs, this left us with a far smaller budget for cabinets that originally anticipated.
In our new search for cabinets, we looked at numerous places, including local kitchen showrooms, big box stores and online suppliers. We then stumbled upon All Wood Cabinetry at Costco of all places. All Wood Cabinetry is a U.S. based semi-custom cabinet manufacturer that focuses on creating quality cabinets with a quick turn around time (they ship within 10 days of your order). All Wood cabinets are assembled in the U.S.A, they note a a plywood box construction with dovetail drawers, and your choice of either wood or MDF faces, depending on the style. In our case, what drew us to All Wood Cabinetry was their Nantucket Polar White Kitchen, which mimicked the look of some of the more expensive we had considered, but at a significantly lower cost. In total, our custom designed kitchen from All Wood Cabinetry came in at 1/3 of the price of the original cabinets we looked at, leaving a huge portion of our budget for all the design elements of the kitchen we wanted. Add in the fact the cabinets carry a limited lifetime warranty and are KCMA certified, and we felt that from a value standpoint, All Wood Cabinetry was the way to go.
After choosing to work with All Wood for our cabinets, we started the design process, which is a little intimidating considering everything’s handled over the phone and/or internet. But as I’d come to find out, I really loved the design process, especially compared to the local big box stores. The process starts by picking a cabinet style. As already noted, we began by choosing the Nantucket Polar White cabinets to help brighten our kitchen and give our kitchen a more clean, modern feel. The next step was working with All Wood Cabinetry to send our kitchen measurements along with inspiration photos to our personal All Wood designer, Jennifer. One phone call and one day later, and we had our first kitchen rendering. And looking back, it was amazing to see how close the first rendering is to our final design. Jennifer did an incredible job taking into account all the inspiration photos we sent her, creating a design that was exactly what we were looking for.
This may sound like an easy feat, but our list of wants was anything but small. Incorporating a 36″ farmhouse sink, numerous custom depth cabinets, island seating for three and counter to ceiling cabinets were some of the things we incorporated. We were anything but easy customers, yet Jennifer took all of our ideas and requests and turned them into a beautiful functionally designed kitchen.
From there, the tweaking process began, which was basically making minor adjustments to the kitchen. And this is what made the design process so great. Because everything’s handled via phone and email, you don’t have to jump into your car and head to the local kitchen showroom to make adjustments. You simply open your computer anytime you want, send your ideas, and you’re done. It just so happened that my husband was on assignment out of the country while we were doing the design, and even he was able to stay involved in the design process despite his hectic schedule. We sent changes to jennifer four or five times before arriving at our final design, each time with less than a day turn around. In total, our kitchen design took less than a week to complete, and we didn’t have to make a single trip anywhere to have it done. From a convenience standpoint, you simply can’t ask for more.
After the design was completed, Jennifer sent the final quote that included an itemized list of every cabinet, piece of hardware and trim that we would need for the kitchen. This was yet another benefit of working with All Wood, as we weren’t quoted a bulk price on the kitchen without knowing where our money was going. Instead, we knew the exact cost of every cabinet and every accessory, which we preferred. We paid for the order online, and in less than two weeks, our kitchen cabinets were on our doorstep. Arriving on four pallets, our All Wood cabinets arrived packaged very well and in perfect condition without any missing pieces. Jennifer had informed us to make sure to inspect all the cabinets so in the event there was a problem, they could have a replacement immediately shipped out. But after checking the cabinets for blemishes, scratches, etc., we were happy to report back to All Wood that we would need no substitutions and had no complaints.
And thus begins our kitchen cabinet installation. To be continued…
We’ll keep you up-to-date on our new kitchen installation, but in the meantime, you can see the cabinets we chose as well as All Wood Cabinetry’s full lineup of products at AllWoodFast.com.
Elecrolux Trash Compactor and Ice Maker
The Electrolux Ice Maker and Trash Compactor deliver both beautiful form and function
In the past, the kitchen was thought of as a functional space – a place to cook food before taking it to the dining room. But today, kitchens have become so much more than just a place to combine ingredients. The kitchens of today are gathering areas, play areas, dining rooms, study areas – they are the grand central station of the home. It’s this truth that makes it so important to consider both the design of your kitchen as well as how it functions, finding the perfect balance between the two.
Not all brands are capable of delivering both beautiful form and function, but one that does so very, very well is Electrolux. If you’re a regular reader of eMercedesBenz you know we’ve covered numerous appliances from their Icon lineup in the past, but I wanted to take an opportunity to discuss two appliances that you may have overlooked for your kitchen. They’re the two appliances that are not only genius in their styling and deisgn but solve problems that have frustrated me for years. The first Electrolux appliance is their Under Counter Trash Compactor and the second is the Under Counter Ice Maker.

Electrolux Trash Compactor Front
Electrolux Trash Compactor
Think about the current garbage situation in your kitchen. There are likely two scenarios: you take your garbage out almost daily to prevent unwanted odors, contributing countless trash bags to an already overflowing landfill; or, you have a garbage that is likely getting plundered by either your canine companion or your relentless toddler. Whatever the situation is in your home, believe when I tell you that there is a better way. A trash compactor eliminates the problem of overflowing garbage and wasted bags, compacting it with the press of a button and keeping both it and the smell away from everyone else in the kitchen.
Not all trash compactors are made equal, however. What’s great about the Electrolux Trash Compactor (other than its beautiful stainless steel design) is its capacity. In total, the Electrolux Trash Compactor is able to contain six 13-gallon garbage bags worth of garbage before you have to take it out. Simply slide the drawer out, unhook the front door locks and your garbage is easily removed. And unlike conventional garbage bags, the Electrolux trash compactor is fitted with the integrated hooks for the garbage bags. Never again will your garbage bag slip off the top of the garbage and into the garbage can, as the fasteners on the outside of the drawer keep the bag securely in place. There’s also a built-in garbage bag storage, keeping the bags close at hand when you need them.

Electrolux Trash Compactor Drawer and Controls
As for functionality, the Electrolux uses an on/off lock (or what I like to think of as a child safety lock), along with the ability to perform a single compaction or hold the trash down for an extended period of time (useful when the trash starts getting more full). Simply press the selected button, close the door, and the trash compactor takes care of the rest. And the best feature? The built in deodorizing system (i.e., no more stinky garbage). Can you imagine what your kitchen would smell like if you left your garbage in your current container for a even a week? With the compactor, you smell nothing, even when you open and close the door. There are no odors, offending or otherwise, that come out, keeping your kitchen smelling fresh and inviting.

Electrolux Ice Maker Front
Electrolux Ice Maker
In addition to the trash compactor, another major problem solving appliance is the Electrolux Ice Maker. It’s perfect for the kitchen, but mine has made it’s way to my basement wet bar. We finished our basement and converted it into a second area for entertaining with a pool table, tv and seating area, topping it all off with a fully functioning bar. At any given time during the weekend we could be hosting between 10-15 people, more on game days. And for the first few months of entertaining downstairs, I ran into one major bar problem: I constantly ran out of ice. Then came the Electrolux Ice Maker and all my ice problems were instantly solved. It was a daiquiri nirvana.

Electrolux Ice Maker Ice Cubes
To meet your ice demands, the Electrolux ice maker is capable of producing 60 lbs of ice every 24 hours while holding 30 lbs of ice at a time. So unless you’re running a restaurant, running out of ice will be a thing of the past. The thickness of the ice is adjustable and constant so you’re always getting uniform cubes, perfect for if you prefer thinner ice that melts quickly or thicker ice that will hold up in the summer. Thanks to the built in filtration system, the ice is always perfectly crystal clear and flavorless, while operation of the unit is quite quiet. Another benefit of the ice maker is that you no longer need to monitor the ice situation – it automatically adjusts production based on how much ice is in reserve, meaning you’ll never run out but you’ll also never have an overflow of ice. Lastly, another intelligent design feature is the ice maker’s drainage system. If you’ve ever been on vacation or failed to use your ice maker for an extended period of time, chances are you’ve experienced the ice cubes turning into a much bigger single block of ice. With the Electrolux Ice Maker, old ice melts and drains, meaning you consistently have the freshest ice possible without ice chunks.
Conclusion
The Electrolux Trash Compactor and the Ice Maker are two appliances that meet very specific needs, but in my home I consider them both must haves. Both feature what I would consider to be a refined minimalist design, seamlessly blending into nearly any kitchen design thanks to its brushed stainless exterior. Add this to the functionality I’ve already described, and you see why I’m such a fan of both. While the trash compactor and ice maker do cost more than the alternatives, the time saved and the lack of frustrations you’ll encounter in your kitchen make them both well worth the added cost.
Electrolux Wine Cooler
For wine lovers, the Electrolux Wine Cooler offers a stunning way to store up to 46 bottles of your favorite vintage
Last month I told you about the Electrolux Beverage Center, which offers a unique way to store not only your favorite beverages, but also a variety of foods and serving platters. And while the Electrolux Beverage Center does offer the ability to store wine, if you’re a wine enthusiast, there’s nothing better at keeping your wine perfectly ready to drink than a dedicated wine cooler.
Thankfully, in addition to their Beverage Center, Electrolux also offers a dedicated 24-inch under-counter Wine Cooler, offering a total capacity of 46 750ml bottles in Electrolux’s stunning stainless steel design. The Wine Cooler’s design matches beautifully to that of the Beverage Center, which makes the pair an ideal addition to an in-home bar or outdoor kitchen, as they can be placed directly next to one another (and look great doing so) all while handling a variety of refrigeration needs.
So is the Electrolux Wine Cooler right for you? If you’re an avid wine drinker, then the answer is absolutely yes. Read on and I’ll tell you why.
Electrolux Under-Counter Wine Cooler Overview
Simply put, the Electrolux Wine Cooler holds 46-bottles of wine in a perfectly temperature controlled environment, ensuring your wine’s quality stays preserved exactly as it was intended to be. There’s five fully expandable Luxury-Glide shelves on top, allowing you to browse your wine collection easily without the need to move bottles around, and because the shelves store the wine on its side, corks stay moist, which is an absolute must if you plan on storing your wine for an extended period of time.
As with other Electrolux appliances, functionality is only part of the package. Not only does the Electrolux Wine Cooler store wine, it does so beautifully, thanks to its Luxury-Design LED lighting. This lighting paired with the largely glass front transforms the Wine Cooler into a beautiful design focal point in your kitchen. And while the majority of storage is dedicated to bottles placed on their side, for entertaining/champagne/bottles you plan on enjoying in the near future, the lowest storage area is designed to perfectly display the bottles you’ve selected, adding yet another unique design feature to the Wine Cooler.

Electrolux Wine Cooler Perfect Set Temperature Control
Electrolux Under-Counter Wine Cooler Features
In terms of features, the Electrolux Wine Cooler has everything you’d expect in a wine storage solution, with its main and most important feature being the ability to precisely select and keep a stable temperature. Thanks to its Perfect Set Temperature Control, you can quickly and easily set any temperature between 45°F and 65°F via the electronic display panel, and in the event this temperature changes, the Electrolux Wine Cooler will alert you through audible beeps as to the specific problem (temperature change, door ajar, power failure, etc.)
From there, the Electrolux Under-Counter Wine Cooler offers a variety of convenience and display features that make using it incredibly simple and intuitive. There’s a vacation mode, which disables lighting and keypad inputs while you travel to aid in conserving energy. There’s the ability to lock the electronic control panel – a wonderful feature for those with touch-happy children. There’s an integrated PureAdvantage air filter, which serves to provide six months of optimum air quality. And as already noted, there’s Luxury-Design LED lighting, allowing to customize your wine display depending on the mood you’re in.
Everything you need to perfectly store your wine is built into the Electrolux Wine Cooler.

Electrolux Wine Cooler Luxury Glide Racks
Electrolux Under-Counter Wine Cooler Design
As is the case with the Electrolux Beverage Center, the design of the Wine Cooler notes a largely glass front panel (that’s also UV-resistant), which pairs exceptionally with the stainless steel design. It’s modern, sleek, a little industrial, and it will look great in virtually any kitchen. Inside, the Wine Cooler’s design is functional and well planned, with the sliding racks easily allowing you to gain access to your full wine collection quickly and easily. And thanks to the LED lighting, reading labels even in a dark space isn’t a problem.
Aside from having your own wine cellar, there’s really not a better way to store your wine.
Electrolux Under-Counter Wine Cooler Conclusion
In planning my own home’s kitchen refrigeration needs, I found that picking between the Electrolux Wine Cooler and Beverage Center boiled down to two things: how much wine is in my collection and how often will I be entertaining. If you have a large wine collection and love entertaining, buy both, as you can never have enough refrigeration space. If your idea of the perfect evening is a romantic dinner for two with a bottle of your favorite vintage, the Wine Cooler will fit the bill perfectly. And if you’re a family that enjoys the occasional bottle of wine, the Beverage Center is an ideal choice. Whatever you pick, you’re going to get the same beautiful design and superb functionality from both.
You can see more of the Electrolux Wine Cooler in the photo gallery below, or head over to the official Electrolux website for more information.
Electrolux Beverage Center
The Electrolux Beverage Center is perfect for not only wine and your favorite drinks, but also serving platters and appetizers
A little over a year ago when it came time to redesign his kitchen, my fellow writer Marcus opted for a suite of appliances from the Electrolux Icon line. So when it came time for me to start shopping for a range of appliances to go in the new house I’m building, Marcus was my go to source for appliance info. A year later, he’s still in love with his appliances, and he wholeheartedly recommended the Electrolux brand to me.
Not wanting to directly steal his style, I opted for the standard Electrolux line, a range of appliances that still offer a commercial stainless steel styling, incredible functionality and a great value for the money.
In the coming weeks I’m going to be detailing a number of appliances from Electrolux, and today I’m kicking things off with the Electrolux Beverage Center – a beautiful under-counter refrigeration unit that brings the style of a dedicated wine cooler with more functionality.
First things first: don’t let its title deceive you. While the Electrolux Beverage Center is a beverage center, it can also serve double duty as a hybrid refrigeration unit, storing both your favorite beverages as well as appetizers, serving trays, or anything else you desire. In many ways, it’s the perfect hosting refrigerator, because not only does it look great, it stores everything you need for basic entertaining, and it does so with ease. And because of it’s convenient 24-inch under-counter design, if you have (or are planning to have) an integrated bar or drink area, the beverage center fits the bill perfectly as a great looking refrigeration unit.

Electrolux Beverage Center Luxury Glide Shelves
Functionally, the Electrolux Beverage Center has everything you could want in a fridge. There’s a Perfect Set digital temperature control, allowing simple temperature settings anywhere from 35 to 45 degrees Fahrenheit. There are three Luxury-Light LED display options – off, low and high – which not only making finding a drink easy in low light, it also looks great and serves as a design focal point in your kitchen. And what may be the best functionality feature: the top two shelves both boast Luxury-Glide functionality, allowing you to fully extend each for easy access to your favorite drink or food without the need to shuffle items around.
Efficiency wise, the Electrolux Beverage Center is great as well, consuming 426 kWH annually at a cost of $45. If you’re going on vacation or don’t plan on using the Beverage Center for an extended period of time, there’s also a Vacation Mode setting, which is easily accessible via the top electronic control panel.

Electrolux Beverage Center Design Elements
And lastly, there’s the design. I’m a huge fan of the Electrolux lineup’s design, which is probably unsurprising, considering I’ve already told you that I’ve purchased them. But in the kitchen, the Electrolux Beverage Center looks absolutely phenomenal, mixing a commercial look with a luxurious refinement along with stunning LED lighting. It’s industrial and cool, but there’s an elegance that makes it perfect for a variety of settings. And because its stainless steel, it’s super simple to keep clean. A quick spray with stainless steel cleaner and a wipe, and it looks like new.
Ultimately, I love the the Electrolux Beverage Center, and as I’ll be detailing in the coming weeks, I love my entire lineup of Electrolux products. You can learn more about the beverage center at the official Electrolux website, or check out photos and details of my Electrolux Beverage Center in the photo gallery below.
Alex Duetto II by Izzo
The Alex Duetto II espresso maker offers a unique dual boiler design, incredible temperature stability and is remarkably easy to use
When it comes to food or anything food related, I’m an unwavering perfectionist in every sense of the word. It’s a compulsion – one that forces me to spend hours studying a given entrée, drink, or what have you, until I find a rendition that in my view, perfectly exemplifies what this particular item should be.
Six months ago, it was this perfectionism that led me on an epic journey into the world of espresso making.
But before I go any further, let me give you a bit of background about myself.
I’m a coffee guy, plain and simple. I love it. There’s not a day that goes by that I don’t have at least a pair of coffee drinks in the morning.
But as with any vice, there’s a problem: coffee isn’t cheap. Step into any main coffee house and you’re spending at least a couple bucks an espresso, $3-5 for milk and espresso drinks, and before you know it, you’re spending almost $10 a morning on coffee. Even worse, you have to take the time to go to the coffee shop and then wait in line to get it.
After realizing the inefficiency of my coffee habit – namely, the amount I was spending weekly and time I wasted procuring it – I decided there had to be a better way.
And that, ladies and gentlemen, is how I was introduced to the world of home espresso making.
Espresso Overview
In America, espresso is arguably one of the most misunderstood drinks there is. Whether you’re going to Starbucks or a local coffee shop, if your espresso tastes burnt, exceptionally dark, sour, or notes any other distinctly unpleasant tastes, there’s a very, very high probability it’s being made incorrectly. It may be the coffee itself, or it may be the technique used to make the espresso.
Contrary to popular belief, espresso is not an acquired taste. If it tastes bad, in all likelihood, it is bad. And in truth, unless you live near a major city, finding exceptionally made espresso is nearly impossible (and even then it can be challenging).
So how can you tell what a good espresso is? There’s really no simple answer. Espresso is like wine, in that each espresso roast notes its own flavor characteristics. But as a general rule, a good espresso should note a distinct flavor. It may be a fruity flavor, it may be a nutty flavor, it may be a chocolatey flavor, or it may be any combination of the three. But if you try an espresso and you’re left with a markedly ashy taste, something’s probably wrong.
In my case, I was fortunate enough to get fantastic espresso from Intelligentsia and Metropolis Coffee in Chicago. Both helped teach me what espresso should taste like, as well as what to avoid.
The Perfect Espresso
So how does one achieve the perfect espresso?
The answer is complicated.
Thankfully, we live in a beautiful age of information – one in which the internet can make a genius out of anyone on any given topic. Pick a subject, and you’ll find a multitude of websites dedicated to educating you about it. Espresso is no exception. When I finally decided to take the plunge into making my own espresso, I found that a multitude of fantastic resources were available online to help even the most basic of novices learn how to become a barista, with Home-Barista.com being one of my favorites. They have not only an incredibly detailed “Guide to Espresso”, they also have a great community of espresso enthusiasts that discuss virtually every element of espresso making.
Ultimately, I’ve found that perfect espresso boils down to four things: 1) the coffee itself, 2) the espresso machine, 3), the espresso grinder, and 4) the barista tools and techniques. Each are vital to the espresso making process, which is why I’m going to be detailing each in separate articles (except for the coffee, which will be detailed in all three).
First is the coffee. It absolutely has to be quality, freshly roasted coffee from a purveyor that knows how to roast. This pretty much eliminates purchasing coffee from the grocery store. Instead, I buy all my coffee online. Some of my favorite sources: Metropolis Coffee, Redbird Coffee and Counter Culture Coffee. If I buy from Metropolis, it arrives a day after roasting. If I buy from Redbird Coffee, it arrives 3 days post roast. The key is knowing the exact roast date of the coffee, and subsequently figuring out the coffees optimal time to use it. Some espresso likes a short rest, some a little longer.
The second element to the perfect espresso is the machine. You need a machine capable of maintaining a consistent brew pressure of 8-9.5 bar and a temperature of 90 – 96 degrees Celsius. As I’m about to detail, I opted for the Alex Duetto II by Izzo, which is capable of doing both with immense precision and consistency.
Thirdly is the grinder. I’m going to be talking about espresso grinders in a separate article, but the key is to find a grinder capable of delivering a consistent grind fine enough to match the espresso you’re preparing. I opted for the MAHLKÖNIG K30 Vario – a commercial grinder that not only delivers an incredibly consistent grind, it also makes adjusting the fineness and amount of espresso ground incredibly simple.
Lastly is the barista tools (and corresponding technique). Again, I’m going to be writing a dedicated article for barista tools, but I opted for a range of tampers and other accessories from TORR, all of which I’ve come to love and use every day.
So that’s the overview of what you need to make the perfect espresso; now we’ll look at the first piece of equipment you’ll need to make it happen: the machine.
Alex Duetto II by Izzo Overview
Enter the world of espresso making, and you’re immediately inundated with a gargantuan assortment of espresso machines spanning the gamut of price and features. Anywhere from a few hundred to $10,000.
Why the huge price difference?
It boils down to temperature consistency, ease-of-use, and at the very high end, style.
As already noted, to create the perfect espresso, you need a consistent brew temperature and pressure with every shot. Because each espresso roast notes different flavor profiles at different temperatures, the ability to adjust and maintain a precise temperature is paramount to bringing out the best possible flavors from each espresso blend.

After spending hours researching various machines, I finally picked the Alex Duetto II by Izzo, and I did so for a variety of reasons. Simply put, the Alex Duetto II boasts nearly all of the features of the most expensive home espresso machines at a fraction of the cost ($2,500 for the Duetto II vs. $5,500 and up for the more expensive machines). At the other end of the spectrum, compared to other, less expensive espresso makers, the Alex Duetto II notes several key features that places it firmly above lesser models, especially when you’re new to home espresso making.
For home baristas, especially those making their first forray into the world of home espresso, the Alex Duetto II really is the perfect blend of price, performance and capabilities.
Alex Duetto II by Izzo Features
Let’s look firstly at the features you’ll find on the Alex Duetto II by Izzo. The Alex Duetto II notes the same functions found on a typical commercial espresso maker, which means it has the main espresso making function (in the center group head), a separate steam wand for steaming milk, and a separate hot water wand to dispense water for tea, etc.
Where the magic really happens, however, is under the hood, where the Alex Duetto II notes a dual boiler design – a design that up until relatively recently, was only available on significantly more expensive espresso makers.

Unlike heat exchanger espresso makers (also known as HX models) that share a boiler, the Alex Duetto II notes separate boilers for the steaming and brewing functions. So while both HX and dual boiler machines can produce an exceptional cup of espresso, the dual boiler makes it substantially easier to do so, because temperatures of each boiler are independent of one another. To set the temperatures, the Duetto II features a PID control for each boiler. Simply pick a brew temperature (typically in the 195 – 201 degree Fahrenheit range ), set it on the electronic PID, and the brew temperature is set and remains constant. The same is true for the steam boiler – pick a temperature (which directly affects steaming pressure), set it on the PID, and you’re done. You always have a visual representation of the temperatures for each boiler, completely eliminating any guesswork. Changing the temperatures involves a couple button presses, and that’s it. If you’re new to espresso making, it’s about as easy as you can get.

As for the actual brewing, the Duetto II features the highly regarded E61 brew group. First used by Faema in the 1961 (hence, it’s name), the E61 is the workhorse of the espresso making world, used over the past four decades in a huge number of espresso machines, both prosumer and commercial. It’s this component that ensures the water temperature from the boiler stays constant all the way through to the coffee, and the E61 is a legend in the industry for doing exactly that. It’s maintains excellent temperature stability, it’s exceptionally robust (meaning if you take care of it, it will give you years of trouble-free use), and in the event you do need to fix it, parts are readily available.
From there, the list of Alex Duetto II features is huge. Here are some of my favorites:
- There’s a water tank, or you can plumb it in directly to your water supply.
- There’s a huge drip tray, or you can plumb it directly to a drain with the included drain kit.
- The steam and hot water wands are insulated, so you won’t burn yourself if you touch them.
- The Duetto II uses a rotary pump, making it substantially quieter than standard pumps.
- You can turn off the steam boiler independently, meaning if all you’re making is espresso, you can save energy.
The final piece of the Alex Duetto II that bears mention is its design. Because an espresso maker will hold a prominent place in your kitchen, design is certainly a factor in your decision making process. Thankfully, the Alex Duetto II is a gorgeous machine, featuring an entirely stainless steel construction. I looked at several machines prior to my purchase, and for me, the Alex Duetto II easily outranked the other machines, both from a style and fit-and-finish standpoint. Six months later, I still love the design of my Alex Duetto II. It fits beautifully in with the rest of my kitchen, and it receives compliments from almost everyone that sees it.
Making Espresso with the Alex Duetto II by Izzo
So how does the Alex Duetto II work? Now that I’ve lived with the Alex Duetto II for over half a year, I can tell you that I’m in love with it. I just returned from a month in Italy and France, and I can honestly say there wasn’t a single time I had an espresso or espresso based drink that rivaled those produced by my Duetto. Even here in the U.S., from places like Intelligentsia, I’ve yet to have an espresso that’s brought me more joy than what I myself can produce from the comfort of my own home.
Using the Alex Duetto II, as I’ve already alluded to, is about as simple as you can get, even if you’re new to home espresso making. In setting up the unit, the first thing you need to choose is either using 15-amp or 20-amp service. It’s the same machine (the 15-amp uses a cord adapter); the difference is that in 20-amp mode, you can steam milk and make espresso simultaneously; in 15-amp mode, you have do one at a time. I’ve used mine in both 15-amp and 20-amp, and both produce equal results.

From there, you have to choose either to plumb in the Duetto II or use the tank and drip tray. Again, you can do both on the fly any time you want. I started using the Duetto II with the water tank and drip tray, then a couple months later I used the included accessories to plumb it in once I had settled on a final location. It’s a very simple process to plumb it in, and once you’ve done it, you’ll never go back to using the tank and drip tray.
And that’s really it as far as setup is concerned. My Alex Duetto II came factory set with a brew temperature of 200 degrees Fahrenheit and steam pressure of 1.5 bars, which is the perfect starting point for making espresso and steaming milk. Grind your espresso into the portafilter, tamp, place the portafilter into the E61 group head, flip the lever, and in 25-30 seconds, you’re on your way to making the perfect cup of espresso.

Once you’ve gotten comfortable with the process, you can then play with the temperature settings to see how it affects the espresso flavor. To change the settings, you hold two buttons on the PID, which brings up the boiler temps. Press the up arrow to enter the main boiler’s temperature setting, then adjust it up or down to change the temperature. Once you know how to do it, you can adjust the temperature in 5 seconds, at most. Changing the steam boilers settings is likewise just as easy, although once set, you’ll likely never have to change it.
As far as consistency is concerned, the Alex Duetto II excels at delivering incredibly great espresso every single time. It’s so consistent, in fact, that in the event there’s a problem with my espresso, I don’t even factor in the Duetto II. Instead, I can attribute it exclusively to an error on my part somewhere else, either in the quality of coffee or in my grind settings and/or tamping. Once you’ve been using it for a couple months, however, and get used to a specific espresso blend, you’re virtually guaranteed your espresso is going to be exactly how you want it, each and every time. It’s absolutely remarkable how easy it is to use, and how stable its performance is. It’s really without fault.
Steaming Milk with the Alex Duetto II by Izzo
For milk based drinks, such as cappuccino or lattes, the steaming function of the Alex Duetto II works brilliantly, thanks to a 1.8L steam boiler with 1,200 W heating element. If you’re new to steaming milk, this is the most difficult part of the learning process; but once you know how to do it, it becomes second nature.
The key to making a milk-based drinks is first understanding what the milk’s texture should be. If you’ve ever been to Starbucks or any coffee house and ordered a cappuccino, you probably received a coffee with a very airy layer of milk on top – so airy, in fact, that as you drank it, the coffee came out without the foam. When you were done, there was probably a layer of foam stuck at the bottom of the cup. This, however, is entirely wrong. Instead, properly steamed milk is known as microfoam in the espresso world (which is used for lattes and latte art), and a slightly more steamed option, which is used for cappuccino.

When steaming, correct microfoam gives a glossy appearance, similar to that of wet paint. There shouldn’t be bubbles – it should be universally smooth – and it shouldn’t be too hot (between 130 – 140 degrees). The result is a beautifully sweet milk that completely transforms the taste of your espresso. Latte art gives a more milky drink, whereas cappuccinos have a slightly thicker layer of milk on top, while still blending in with the rest of the coffee. There’s a great video demonstrating a properly made cappuccino on Vimeo, although I typically reserve latte art for lattes and macchiatos.
Never having steamed my own milk before, it took about a month before I was fairly comfortable steaming milk with the Duetto II. The most difficult part is simply technique – finding the correct spot to place the steam wand during steaming. From a power standpoint of the machine, however, the Alex Duetto II notes more power than you need to make perfect microfoam each and every time. I have my Duetto II set to 1.5 bars of pressure, and it works brilliantly – easily producing results equatable to those from my favorite coffee houses.
A couple tips I learned along the way:
- Firstly, when you’re steaming, keep your hand on the bottom of the pitcher. As it’s nearing the point it’s too hot to touch, stop steaming, otherwise you’ll burn the milk and ruin the texture.
- All milks aren’t created equal. Use the freshest milk you can find, and experiment with different brands. Here in the Midwest, it’s easy to buy local milk, and I’ve found the fresher the milk, the better the microfoam (and taste).
- Keep the milk pitcher and milk cold. You want enough time for the milk to properly steam before getting too hot, so keeping the milk and pitcher cold buys you extra time.
Alex Duetto II by Izzo Maintenance
If you’re wondering how much work it is to maintain the Duetto II, it’s quite easy. After making an espresso, take out the portafilter, dump the coffee puck, wipe, and you’re ready to make another espresso. When I’m done for the day, I run a few seconds of water through the group head, then wipe off the screen. And every few weeks, I run a bit of espresso cleaning solution in a special portafilter to flush out the group head – a process that takes a couple minutes in total.
It’s remarkably easy to take care of the Duetto II, and after more than six months of use, it looks and operates exactly as it did the day I bought it.
Where to Buy the Alex Duetto II by Izzo
As great as the Alex Duetto II is and has been for me, a huge factor in the decision making process came from where I bought it: Chris Coffee. Chris Coffee is without a doubt the preeminent purveyor of espresso and coffee making equipment, both for home use and commercial use, and I really can’t recommend the entire staff at Chris Coffee highly enough.
I can’t tell you how much time I spent researching espresso makers, and Chris Coffee took a tremendous amount of time answering the many, many questions I asked and ensuring I made the right choice. Whether you get the Alex Duetto II or are considering a different espresso maker, talk the to the staff at Chris Coffee, as they’re an invaluable resource for all things coffee. They carry a huge range of espresso makers, grinders, accessories and coffee-related goodness, and they’re easily the best way to get you started on your path to espresso nirvana. And although I haven’t used it, Chris Coffee also has an exceptional service department, so in the event you do have a problem with your machine, you’re always covered with top-notch support.
Alex Duetto II by Izzo Conclusion
After spending over six months with the Alex Duetto II, it has surpassed what I thought was possible from home espresso. I was confident I’d be able to make good espresso at home, but the fact I can make espresso that rivals that of the best coffee houses is incredible. Even better, however, is that I can do it consistently on a daily basis.
If you love espresso but haven’t made the plunge to a home unit, I can’t recommend it enough. Talk to the guys at Chris Coffee, put the Alex Duetto II at the top of your list, and you’ll be making the best espresso you’ve ever tasted from the comfort of your own home, guaranteed.
You can learn more about the Alex Duetto II by visiting the Chris Coffee website (currently the Duetto II is on sale for $2,250), or you can check out photos of my Alex Duetto II in the gallery below. Also, be sure to check out part two of our espresso guide, where we look at the Mahlkönig K30 Vario grinder; and part three of our espresso guide, where we look at Torr tampers and other espresso accessories.
Torr Tampers and Espresso Accessories
Torr tampers and accessories add a touch of style and function to your espresso making arsenal
In part one of our guide to the perfect espresso, I told you about my espresso maker of choice: the Alex Duetto II by Izzo. In part two of the series, I detailed my espresso grinder of choice: the Mahlkönig K30 Vario single espresso grinder. Today, we’ve got the final piece in my espresso series, and in it, I’m going to tell you about a variety of barista tools that I’m using – all of which play an integral role in ensuring the espresso making process is as simple and consistent as possible.
“Is your choice of barista tools really that important?” you may be thinking, and the answer is absolutely yes. In preparing espresso, once the coffee is ground into the portafilter, the action you as a barista will undertake is the all-important tamp, which means using a tamper to press the coffee down into the basket. It’s a highly debated topic – how hard should you tamp, which tamper shape should you use, etc., and I’m here to help guide you in the tamper decision making process. I’m also going to detail a couple extra addtions to the espresso making process (namely, a milk steaming thermometer and knockbox), both of which will make your life easier as a home barista.
Read on for the final installment of our guide to the perfect espresso and the tools of the trade that will make your barista life much easier.
Torr Tampers Overview
If espresso making is an art form, then the tamper is your paint brush. It’s the one element in the espresso making process that varies based on your direct input. A perfect grind and dose with the wrong tamp can ruin the perfect espresso shot.
So what’s the perfect tamp? Talk to some baristas, and they prefer a finer grind with a light tamp. Other baristas prefer a coarser grind with a hard tamp. What I’ve found is that different espresso blends work better with different tamping techniques – some like a light tamp, some like a hard tamp – you just need to experiment to see what you like best for each coffee.
That’s where the tamper comes into play. The key to tamping is the ability to produce a repeatable tamp every time, then adjusting your grinder settings from there. If you can’t keep your tamping pressure consistent, you can’t pick a grind setting, because the espresso flow will vary depending on your tamping pressure.
For example, let’s say you’re experimenting with a light tamp. As long as you keep tamping pressure the same, the flow rate of your espresso shot will only change if you alter your grind setting. If you can’t keep tamping pressure consistent, however, the amount of espresso produced will go up or down (sometimes significantly), even at the same grind setting, making it virtually impossible to get consistent results.
So what’s the key to a consistent tamp? In my opinion, it’s finding a tamper that fits comfortably into your hand. I tried multiple tampers from different brands, and for me, Torr tampers (made by cafekultur in Germany) were by-and-large my favorites. They’re incredibly comfortable, and they come in varying sizes, depending on your fit preferences. On top of their comfort, they’re also beautifully crafted, to the point they’re nothing short of barista art.
I liked Torr tampers so much I bought not one, not two, but four of them. Overkill? Maybe. But they’re gorgeous to look at, and most importantly, they give me repeatable results every time I use them. For home espresso making, you’ve got to add at least one to your barista tool arsenal.
Torr Tamper Pistons
Torr Tampers consist of two parts: the piston (the bottom metal portion that fits into the basket) and the handle. Depending on your color and material preferences, handles are interchangeable with pistons, allowing for a tremendous level of customization, as I’ll detail shortly.
Looking at the Torr pistons first, there are a total of four shapes you can opt for: flat, soft convex, strong convex, and another convex that’s flat in the center and tapers on the edges. Which one is best? There’s really no right or wrong answer, as every barista has their own preferences. When making espresso, however, a weak point of the puck (i.e., the coffee in the basket) is around the edges. If not distributed and tamped correctly, water can break through the edges early (known as channeling), which lessens the quality of the espresso. The idea behind convex tampers is that they help reduce channeling on the edges, because they provide a little additional support around the puck’s edge.

I personally own convex and flat, and if I had to pick one, I’d pick soft convex as the overall winner. It may be my imagination, but I feel like in triple baskets, I note a little less channeling than I do with a flat tamper. For single and double baskets, I use both convex and flat interchangeably, and get exceptional results from each.
Once you’ve picked a shape, step two is picking a material. Torr Tamper pistons are available in either stainless steel or titanium, with the titanium featuring a gorgeous black finish. Again, which you select is entirely up to you, but let me state for the record that the machining of both is absolutely incredible. They’re CNC machined, hand finished and polished in a multistage process, and the end result is a perfectly crafted piece of engineering.
Lastly, the final option with the piston is selecting the size (in mm), which is simply a case of matching the size basket you’re using in your portafilter.
Torr Tamper Handles
After picking the perfect piston for your espresso making fun, step two is far more about style: picking the handle. Torr tampers come in a stunning selection of woods, which includes zebra wood, burled walnut, Brasilian palisander, violet wood and African blackwood. Every handle is hand-crafted from the finest woods harvested from responsibly managed FSC-certified forests, with all the wood hand-selected by the artisans using it. Once raw materials are selected, they’re then hand-shaped on a lathe in a multi-step shaping process – a process that takes up to a few months – then given a natural oil finish. No synthetic stains are used, which means that the true beauty of the wood is always perfectly showcased and no two handles are ever the same.

In addition to the wood, Torr tampers are also available in an aluminum construction in several colors and designs, including white, black and red. Torr’s aluminum handles all note a lead-free finish that’s extremely comfortable to the touch, and it’s also formulated specifically to resist fingerprints and smudging, meaning it will maintain it’s lustrous appearance even after extended use.
The final choice in handles is in regards to size: classic or XS. I personally own both, and having what I would consider to be medium to large hands, the classic is the better fit for me. For small to medium hands, I’d opt for the XS. What they both have in common, however, is their balance – in either size, the balance of Torr tampers is superb. Their weight is perfect, they just feel right in your hand, and when tamping, they make it incredibly easy to get absolutely consistent results with each and every tamp. This, is tandem with the fact they look absolutely stunning, makes Torr tampers my favorite option for tamping, without question.
Knock BoXx by cafecultur
When purchasing Torr tampers for my espresso making journey, I picked up a few other accessories as well, which I’ve found make the process significantly more convenient. The first is the Knock BoXx by cafecultur, which if you’re new to espresso making, is the easiest way to dispose of the coffee puck after you’ve made an espresso. Basically, it’s an industrial strength stainless steel box with a bar across the center that lets you knock the portafilter against it. By doing so, the entire coffee puck is disposed of in one fell swoop, with a quick wipe of the portafilter all that’s necessary to clean it. Without a knockbox, it’s difficult to get all the used coffee out of the portafilter without manually having to scrape it out or rinse it in the sink, so the BoXx saves a significant amount of cleanup time.

Because the act of hitting your portafilter into a stainless steel box by itself would be a loud, rattling process, the BoXx notes three levels of suspension to reduce noise and shock. First, a layer of foam is sandwiched between the inner and outer boxes; a second layer of foam is placed on the bottom of the BoXx; and lastly, the knock bar is both padded and spring loaded. It’s a system that works quite well, as it not only completely empties the used coffee, it’s not overly loud or jarring to the portafilter.
And if you’d like to add a bit of style to your BoXx, as with the portafilter, it’s available in several finishes, including burled walnut, stainless steel, ebony, palisander and more.
I have the stainless steel BoXx, I’ve used it every day since I purchased my espresso making setup, and it’s performed beautifully, carrying out it’s designated function and still looking and working like new in the process.
Milk Thermometer
The final thing I’d recommend to those of you new to espresso making is a milk thermometer – something that will make it significantly easier learning how to steam your milk. Unbeknownst to almost every major coffee chain, when steaming milk, there’s an ideal temperature you’re trying to achieve – right in the 145 degree Fahrenheit range. At this temperature, milk develops a beautifully sweet flavor and texture. If you go higher than 150 degrees, milk quickly develops a burnt taste and the texture is destroyed. Steam less, however, and the milk won’t be hot enough, and will feel like lukewarm milk with no additional texture or taste.

Because of this narrow temperature band, a thermometer makes it much easier to hit your desired temperature. Cafekultur’s thermometer features a large, easy-to-read dial with a marked temperature point to get you into the right range. It’s also made from stainless steel and notes a low placed measuring point, making it ideal for frothing pitchers. It also features a clip to hook inside your steaming pitcher, allowing for hands free temperature readings.
Once you’re familiar with steaming milk you likely won’t use a milk thermometer, but when starting out, I highly recommend one to help significantly reduce the learning curve.
Conclusion
And that, ladies and gentlemen, wraps up our three part guide to the perfect espresso. If you’re a coffee lover, I can’t recommend enough learning how to make espresso, as the quality of what you can make at home is absolutely astonishing. You’ll drastically better the offerings of those put out by national coffee chains and match those of the country’s best independent coffee houses. It’s a learning experience, to be sure, but once you do it, you’ll never look at coffee the same way again.
To learn more about Torr Tampers and accessories, you can head over to the cafekultur website for their full lineup of barista tools. Lastly, you can check out my Torr tampers and accessories of choice in the gallery below.
Komo Duett 100
The Komo Duett 100 combines a grain mill and flaker in a single unit, making grinding your own grains at home a breeze
Imagine a world with no bread. Your favorite sandwiches, gone. Breakfasts, ruined. Pizza is no more. Even tortillas are a form of bread, thus eliminating Mexican cuisine as we know it.
Simply put, bread is the food equivalent of water, a nourishing staple that’s sustained civilizations for thousands of years. And the best part? It’s simplicity. At it’s core, bread is merely milled grain and water. Add yeast or other leavening agents and bread takes on thousands of new dimensions.
But there’s a problem. As food production has been industrialized and local bakeries have been replaced with large commercial bread producers, the quality of bread has deteriorated to a point that virtually all of its health benefits have evaporated. Look at the packaging of bread at your local grocery store, and you need a PhD in chemistry to understand the ingredient list.
Simply put, making bread is no longer about providing vital nourishment, it’s about creating something that has the longest possible shelf life.
The Commercial Bread Making Process
To understand commercial bread in America, you have to understand the basics of grain and how the commercial bread making process works. In the U.S., where most bread is made from wheat, the process begins with fresh wheat being ground and sifted. And it’s this initial step where the problem begins. In sifting the flour, the wheat’s bran and germ are removed, but it’s these two elements that contain virtually all of the nutrients offered by the grain.
Due to their high nutritional value, the bran and germ are sold as feed for livestock and other animals. What’s left is white flour, a highly starchy substance with little nutritional value, and it’s this white flour that’s the primary ingredient in so many breads. From a statistical perspective, 95% of flour sold is of the white variety. And if that isn’t bad enough, oftentimes the flour is bleached simply for the sake of making it whiter, which adds in a lovely dash of benzoyl peroxide or chlorine as well (despite the fact these substances are banned in the European Union).
“What about whole wheat?”, you ask.
Whole wheat is better, to be sure, but it’s an incremental improvement. I told you how wheat is ground and sifted. Whole wheat flour is still sifted, with the key difference being the bran is added back in. What you’re missing, however, is the germ, which is a key component to wheat’s nutritional value. The germ is the wheat’s embryo, and it’s the most vitamin and mineral rich part of the wheat kernel. Without going to specifics, wheat germ is loaded with B vitamins, fiber, phytosterols, omega-3 fatty acids, vitamin E, and the list goes on.
So why is the germ left out? Because the germ’s healthy oils go rancid quickly, making it more difficult to use because the wheat can’t be stored as long. Difficult isn’t cost effective, so the germ is left out. Even without the germ, however, store bought bread is still loaded with preservatives, many of which are banned in other countries and all of which negatively affect your health.
So what are your options?
You’ve got three. If you’re completely opposed to baking yourself, you can find a bakery that uses freshly ground flour to produce their breads. The second option is to find a source that freshly grinds their own wheat and purchase flour from them. The third option, and the one I highly recommend, is that you purchase a grain mill and use your own freshly milled flour to create your own baking masterpieces.
Sound too difficult? It isn’t.
As the owner of a Komo Duett 100 grain mill, I’m here to tell you that milling your own grain is about as simple as you can get. Anyone with even the most basic baking skills can use a Komo grain mill to grind their own flour, and the result will be a bread that is simply astonishing compared to anything you’ll find in a grocery store.
Read on and I’ll tell you what makes Komo grain mills so great.
Who is Komo?
Based in Germany, Komo is a company founded by Peter Koidl of Austria and Wolfgang Mock of Germany, and they’ve been manufacturing grain mills for over 25 years. Their grain mills come in a variety of designs and sizes, with the key differences being the style of the exterior housing as well as the speed of grinding. All our housed in gorgeous furniture grade beechwood, and all are stunning in design.
To ensure consistent, low temperature grinding , Komo mills utilize a combination of corundum/ceramic stones. Stones have been used for centuries as the optimal way to mill grain, but unlike other stones that have a tendency to wear out over time and require a relatively high amount of maintenance, Komo’s proprietary stone grinders offer the benefits of stone milling with a material that’s self cleaning and virtually indestructible. The result is years of hassle free grain milling with virtually no maintenance required.
Another engineering element unique to Komo is their patented spring tensioners for the millstones. As opposed to fixed millstones that have a tendency to be very loud, Komo mills’s stones are spring tensioned, which not only signficantly cuts down the noise when grinding, it also helps preserve the millstones themselves.
The Komo Duett 100 Overview
Picking a Komo grain mill is a case of picking a design that fits your kitchen and picking a size that can handle the amount of grain you want to mill. There’s a total of eight different Komo design configurations, six of which are strictly grain mills. The other two, one of which is the Komo Duett 100, offers both a grain mill and a flaker in a single unit. Highlights of the Duett 100 include two separate electric motors (360W for the mill and 140W for the flaker), 3.35 inch diameter mill stones and a 2 lb. 10 oz. hopper fill capacity.

So why did I pick the Komo Duett 100? I picked it for a couple reasons. Number one, I knew that I wanted both a grain mill and a flaker, which meant I could either buy both units separately or buy both in a single unit. While there are advantages to both, for me, the advantages of the Duett 100 outweighed purchasing two separate units. Cost wise, it’s cheaper to buy the Duett 100. I’m a fan of saving money, so that’s a clear advantage for the Duett. Secondly, because I planned on keeping the Komo on my counter as opposed to putting it away after every use, having both the mill and flaker in a single unit makes the design a little more streamlined (one unit on your counter instead of two). If I was short on counter space or planned on putting the mill away when not in use, then I would have seriously considered splitting up the units.
The second reason I picked the Duett 100 is simply because I liked its design. It’s simple, it’s rustic with a hint of elegance, and I like the sweeping curve over the flaker. Because it’s going to be staying on my counter, I wanted a design I could look at everyday for years to come, and for me, the Duett 100 fit the bill perfectly.
As for what the Komo Duett 100 can mill, the list is extensive. Hard and soft wheat, dehulled oats, rice, triticale, kamut, spelt, buckwheat, barley, rye, millet, teff, quinoa, amaranth, sorghum and dent (field) corn. It will also grind spices, lentils and dry beans (pinto, red, garbanzo, kidney, etc.). What you don’t want to use it for is herbs, oilseeds (flax, sesame), popcorn or fibrous materials. As for the flaker, it’s ideal for rolling all softer grains.
The Komo Duett 100 in Use
So how does the Komo Duett 100 work? It works fantastically well, and just as importantly, it’s fantastically easy to use. If you’ve ever ground coffee, then you know exactly how the Komo mill works. First, you fill the Komo’s hopper with your grain of choice. We’ll use wheat as an example. Once you’ve filled the wheat, you turn the mill on, and voila, the wheat is ground. Depending on the type of flour you need, whether coarse or fine, you can rotate the adjustable grind setting, giving you a grind as fine as pastry flour up to a relatively coarse grind. As a side note, for some grains, I’ve found it’s better to turn the Duett on first, then add the grain for milling.

Once the wheat is ground, you can then choose to use the flour as is, keeping all the bran and germ and their corresponding health benefits. You can also choose to sift the flour, removing as much or as little bran and germ as you wish.
On the flaker side, it works exactly the same. Add your wheat, turn the flaker on, and you’ve got an instant, incredibly healthy breakfast.
For me, the Komo translates into an on-demand mill. It’s rare for me to grind anything in advance. For example, if I’m making waffles or pancakes for breakfast, my first step is heading to the mill, grinding the exact amount of flour I need, and using this flour in the batter. It adds maybe a minute to the breakfast making process, with the benefit being the flour is absolutely fresh and retains all of its nutritional benefits.
Baking for the most part is exactly the same. If I’m baking a couple loaves of bread, I head to the Komo Duett, place a bowl on a scale to weigh the flour as it’s being ground, and grind exactly the amount of flour I need. The exception is if I’m sifting the flour, in which case I have to account for the weight being removed. It’s rare for me to grind flour in advance, simply because it’s such a simple task that it adds hardly any time to the baking process.
Taste wise, there’s absolutely no comparison between freshly ground flour and that of the store bought variety (whether you buy flour or already baked bread). In milling it yourself, you understand what grains should taste like. Whole wheat breads made from commercial flour taste are typically bland and dry, more reminiscent of cardboard than something you actually enjoy eating. And for good reason. Taking out the germ is taking out the healthy fats.
Imagine doing the same thing with meat (we’ll use steak as an example). The beauty of a well marbled steak is the fat. It’s what gives the steak it’s gorgeous texture and taste. Take away the fat, and you’ve completely taken away what makes the steak great. Wheat is no different. Take away the germ, and you’re taking away the fats that give the wheat it’s taste and texture attributes.
Keeping the germ, freshly milled wheat takes on a completely different perspective. Bread is so much more flavorful, with a distinctly nutty taste, and the bland, dry texture is gone. The same is true for pancakes, waffles, or anything else you use flour in. You’ll experience entirely new tastes in virtually everything that you eat, with the added benefit that it’s now loaded with additional vitamins and minerals.
The Komo Duett 100 Conclusion
If I have one regret about the Komo Duett 100, it’s that I didn’t purchase it sooner. As an avid home chef with a growing family, I’ve come to analyze everything that I eat. I want my food to taste as good as possible, but I also want it to be as healthy as possible.
You are what you eat, and for most, bread in one form or another is an integral part of daily life. After learning more about the state of commercial bread making and flour processing, I decided the only way to truly gain the health benefits inherent to grain was to mill it myself. I control the quality of wheat that I purchase, and I control it’s nutritional benefits. And the best part? How easy the Komo Duett 100 makes it to do so.
By adding a minute or two onto whatever it is I’m baking, I’m getting 100% of the grain’s nutrients. Not only that, I’m opening up a world of new tastes in everything I prepare. Bread tastes incredible, waffles and pancakes taste incredible… everything I make with flour takes on an entirely new dimension.
Do you want to know why grains have been the primary staple food for thousands of years? Purchase a grain mill, grind your own grain, and you’ll find out. It is, in no simpler terms, the perfect food – the basis for cuisines across the world. With a Komo mill, you’re not just eating grains, you’re eating grains as they were meant to be eaten, with their full flavor and nutritional value in tact.
To learn more about Komo mill as well as the Komo Duett 100 in particular, head over to Pleasant Hill Grain, the U.S. distributor for Komo mills. The current pricing for the Komo Duett 100 is $859, which includes shipping. While you’re there, you can also see the full lineup of Komo mills along with the full specs of each, as well as various accessories that can accompany Komo mills. Once you purchase a Komo mill, Pleasant Hill Grain also offers a huge variety of grains and other baking equipment, allowing you to experience a world of new baking without leaving the house.
Electrolux Icon Under-Counter Wine Cooler
The Electrolux Icon Under-Counter Wine Cooler stores 48 bottles of your favorite vintage with precise temperature control
Wrapping up our look at the best refrigeration options for your kitchen, the final piece of the puzzle for those of you looking to separate your refrigeration spaces is the Electrolux Icon Under-Counter Wine Cooler. As you may remember, my kitchen arrangement limited me in terms of how big my main refrigerator was, so I opted to split my refrigeration up into three parts: the Electrolux Icon French Door Refrigerator, the Electrolux Icon Refrigerator Drawers, and as I’m about to detail, the Electrolux Icon Under-Counter Wine Cooler.
Functionally, splitting up your refrigeration units is easily the most flexible design option you can make. In doing so, you can store some of your most used items in locations far more accessible than your main refrigerator, whether under any counter or as part of an island, and even better, you can create areas of your kitchen designed around a specific task. With the Electrolux Wine Cooler, for instance, my kitchen design has it located in a separate nook/bar area, with corresponding wine glasses, wine accessories, etc. all centered around the wine cooler. I’m a big fan of organization, so having various spaces in the kitchen designated for certain tasks with integrated refrigeration is fantastic.
As for the decision to opt for a winer cooler, my wife and I both enjoy wine to the extent we keep about 40 bottles on hand. Correct storage of wine with precise temperature controls is an integral part of ensuring the wine’s quality is maintained over extended periods of time, so logically it made sense for us to opt for a wine cooler. Considering most of our other appliances are from the Electrolux Icon line, selecting the Electrolux Icon Under-Counter Wine Cooler was an easy decision, as it offers precise temperature adjustment and a stunning design that perfectly coincides with the rest of the Electrolux Icon range.
Electrolux Icon Under-Counter Wine Cooler Features
In selecting a wine cooler, two of the elements to consider are the number of bottles its capable of storing as well as its ability to precisely control and keep a stable temperature. With the Electrolux Icon Under-Counter Wine Cooler, you have the ability to store up to 48 bottles of your favorite vintage, while an integrated electronic control panel on the top of the door allows you to set the temperature anywhere between 45°F and 65°F. In addition to the temperature controls, other technological features include a door ajar alarm, a power failure alarm and a high temperature acoustic alarm (if the monitored temperature deviates from your set temperature).
As for the wine storage itself, there’s a total of five upper racks that store a total of eight bottles each, and there’s a total of two lower racks that store a total of four bottles each. To ensure the quality of the wine is maintained, bottles are all stored in the ideal horizontal position, keeping the corks moist and preventing air leakage that accompanies dry corks. To access the wine, all racks feature a unique full extension design which gives you a completely clear, full view of each bottle on the rack.
Lastly, there’s a few other features of the Electrolux Icon Under-Counter Wine Cooler I’ve come to love, including its theater style lighting. Matching the rest of the Electrolux Icon range, the theater style lighting not only looks incredible, it makes its easy to select a bottle irregardless of other lighting conditions in your kitchen. Another feature I love is the ability to manually control the wine cooler’s electronics, depending on my particular needs. The lighting, for instance, can be manually turned on or off in varying intensities, even with the door closed. There’s a vacation mode, which disables lighting and keypad inputs while you’re away, helping conserve energy. And there’s the ability to lock the electronic keypad, which is a much needed feature if you have small children who enjoy playing with the lights (as I do). Finally, to ensure the air circulating in the wine cooler stays fresh, an integrated PureAdvantage air filter is included, providing six months of optimum air quality.
Electrolux Icon Under-Counter Wine Cooler Design
The entire Electrolux Icon lineup of appliances notes a stunning, commercial inspired design, and the under-counter wine cooler is no exception. Unlike most other members of the Icon family that note a solid stainless front, however, the wine cooler notes a combination of stainless steel and glass – so while it manages to maintain a stately commercial look, it still offers a beautiful view of the wine collection stored inside. And while glass does have potential to allow harmful UV rays to negatively alter your wine, the Electrolux Icon Wine Cooler’s glass is both tinted and UV-filtered, ensuring that even with the glass panel, your wine will stay completely protected during storage.
Matching the gorgeous exterior, inside the Electrolux Icon Wine Cooler is equally as beautiful. The fully extendable wine racks are constructed from black soft coat wireform, perfectly framing your collection, while the front of each rack notes an unfinished maple for a warm finishing touch. The racks also feature a ball bearing roller system, meaning not only do they fully extend, they glide effortlessly in and out as well.
And finally, like the rest of the Electrolux Icon lineup, you have a total of two design options to choose from: the Professional Series or the Designer Series. Both series note an identical feature set – the key difference between each is simply the handle and inclusion of the small decorative Icon nameplate. Whereas the Professional Series notes a round, more commercial style handle and aforementioned Icon nameplate, the Designer Series notes a flatter, more contemporary handle and no nameplate. Aside from the handles, both wine coolers are identical.
Electrolux Icon Under-Counter Wine Cooler Conclusion
For me, selecting the Electrolux Icon Under-Counter Wine Cooler was an easy decision, influenced by the fact that with a small yet important wine collection, I wanted a place to correctly store them in my kitchen. And as I’ve come to learn, once you start a wine collection, it tends to grow, so you’re better buying a larger capacity than you need, as opposed to one that fits your current collection perfectly. For me, the Electrolux Icon wine cooler fit the bill precisely, offering the ideal amount of wine storage in a package that like the rest of the Electrolux Icon range, is simply gorgeous. Its stunning design paired with its precise temperature control combined to offer the perfect wine cooler for my kitchen, and as with all my Electrolux Icon appliances, I’ve yet to find fault with any. They’ve not only met my expectations, they’ve exceeded them, and I can’t recommend them enough.
Electrolux Icon Under-Counter Refrigerator Drawers
Electrolux Icon Refrigerator Drawers offer an ideal solution for anyone looking to fine-tune refrigeration in their kitchen
About a month ago I told you of my quest for the perfect refrigeration setup in my new kitchen, detailing my choice of the Electrolux Icon French Door Refrigerator. While debating what the ideal size for a refrigerator was, I eventually decided to split my kitchen refrigeration up into units, opting for the Electrolux Icon Under-Counter Refrigerator Drawers and the Electrolux Icon Wine Cooler in addition to the main refrigerator.
My primary reason for doing so was flexibility – I loved the idea of being able to have integrated refrigeration anywhere I wanted it. Because much of my kitchen preparation is done on an island, having the ability to locate the refrigerator drawers directly on the island is a tremendous time saver. It’s also great for kids, as my wife and I tend to keep a variety of their most used snacks and drinks in the refrigerator drawers, making it much easier for them to grab a snack when the need arises.
Having used the Electrolux Icon Under-Counter Refrigeration Drawers for the past few months, I have to say: if you’re planning a new kitchen, it’s well worth considering refrigeration drawers. Here’s some of the elements that make the Electrolux Icon Refrigerator Drawers so great.
Electrolux Icon Under-Counter Refrigerator Drawers Size
With any type of refrigeration, size may be the most important factor to consider. With the Electrolux Icon Refrigerator Drawers, you’ll gain a total of 5.0 Cu. Ft., with the unit measuring 23-13/16″ W x 34″ – 35″ D. Making the available size so usable, however, is the fact that you’re able to store 12″ bottles and two liter containers – perfect for wine and a wide number of beverages – and it’s wide enough to store platters. For anyone that entertains, it’s a fantastic way to gain extra refrigeration in addition to your main refrigerator, and for as already noted, for anyone with a family, it’s a great way to keep your most used items exactly where you want them.
Electrolux Icon Under-Counter Refrigerator Technology
Technologically, the Electrolux Icon Under-Counter Refrigerator Drawers boasts similar features to those found on the rest of the Electrolux Icon lineup, with one of my favorites being the integrated digital control panel on the top of the unit. Not only does the control panel make it simple to set your desired temperature (anywhere from 33 to 46 degrees Fahrenheit), it also helps the refrigerator drawers maintain their gorgeous modern look. Another technological feature I’ve grown to love is the warning alarm. Like the Elextrolux Icon French Door Refrigerator, the under-counter refrigerator drawers give an audible warning in the event the drawers are left open for longer than five minutes, if the temperature rises 10 degrees or more for four hours, or if there’s been a power failure. With kids, it’s a feature that I use almost daily, as my son has a tendency to never close the drawers. And lastly, the final feature that mimics the rest of the Electrolux Icon lineup is the built in theater LED lighting, which not only makes your food look fantastic, it makes grabbing a late night drink or snack much, much easier. It may sound like a relatively small selling point, but when you see Electrolux’s LED lighting in action, it really is a thing of beauty.
Electrolux Icon Under-Counter Refrigerator Design
If you’ve read my other Electrolux Icon reviews, this is going to sound a bit redundant, the reason being that Electrolux has done an incredible job at ensuring that all note a similarly sculpted, somewhat industrial design. From the outside, a beautiful solid stainless steel face with your choice of either the Professional Series or Designer Series handle ties the refrigerator drawers beautifully in to the rest of the Electrolux Icon lineup. I personally love the look of the Professional Series (which is what’s pictured), as it manages to blend a commercial style with a sculpted level of refinement. Each Electrolux Icon piece looks like a solid block of steel, and they’re just gorgeous. From a functional design standpoint, the under-counter refrigerator drawers incorporate what Electrolux calls Smooth-Glide drawers, and if you haven’t already guessed, it makes opening and closing the drawers exceptionally easy – so easy you can do with a single finger. Overall, it’s a simple yet beautiful design, both from an appearance and functional standpoint, and one that fits perfectly with the rest of the Electrolux Icon lineup.
Electrolux Icon Under-Counter Refrigerator Conclusion
Ultimately, if you’re considering a new kitchen or updating your current one, I’m a huge proponent of considering a smaller refrigerator with separate refrigerator drawers. As I’ve come to learn, it allows you to fine tune how you operate in the kitchen, letting you place your most used refrigerated items exactly where you want them, including on a kitchen island. And by opting for a smaller refrigerator, you have more freedom as to where to position your main refrigerator while gaining additional cabinet space. To anyone considering the refrigerator drawers, my advice would be this: when you’re in the kitchen, pay attention to how many times you run to the fridge to grab something during a meal preparation, and how much time you spend doing so. Then, imagine having secondary refrigeration at your disposal directly where you’re preparing the meal, saving you the time it takes to run back and forth from the fridge. In my case, the result was a significant time savings, making the decision to opt for the refrigerator drawers a no-brainer. Three months later, and I couldn’t be happier with my decision, as the Electrolux Icon refrigerator drawers have done everything I wanted: they perform brilliantly, they look great, and they’ve significantly cut down the time both my wife and I spend in the kitchen. Simply put, I highly recommend them.
To learn more about the Electrolux Icon Under-Counter Refrigerator Drawers, you can learn more at the official Electrolux Icon website.
Electrolux Icon Ice Maker and Trash Compactor
The Electrolux Icon ice maker and trash compactor add two unique levels of functionality to your kitchen in a gorgeous design
Form or function – it’s a debate that will likely rage on from now until eternity. Engineers love function; designers love form. From a professional standpoint, I work both in design and engineering, so it’s not surprising I find myself split between the two. In almost every facet of my spending, once I’ve found a design I like, I take a ridiculous amount of time researching the said product, just to make sure it’s going to perform the way I expect it to. I honestly can’t tell you the last time I’ve walked into a store and made anything even close to a major purchase without extensively researching it online first. A compulsion? Maybe. But it’s saved me from the immense annoyance of buying something that looks good, only to find out it’s a completely and utterly useless piece of trash.
Which brings us here. If you caught my review of the Electrolux Icon dishwasher last week, you already know I’ve embarked on the adventure of a undertaking a major kitchen makeover. If you’re shopping for a new dishwasher, I recommend checking it out; if not, here’s a recap. I bought a beautiful house built in the ’60’s, but unfortunately, the kitchen is small and outdated. Rather than taking the traditional approach of new kitchen cabinets, countertops, etc., I’m working in reverse, making it work the way I want it to, and then building the cabinets and design around my desired functionality. From a functional standpoint, the worst offender in my old kitchen was the dishwasher – it was both ridiculously loud and terrible at cleaning. As any chef knows, cooking gets very messy, very quickly, so a dishwasher that works is a must. To solve my dishwashing conundrum, I eventually settled on the Electrolux Icon, and I’ve been tremendously happy with my selection.
While I was making the dishwasher purchase, I started thinking about what other functionality I’d like in the kitchen – functionality that didn’t currently exist. Two of the areas that I’ve found myself consistently wishing for were good ice (I’ll explain more in a second), and a solution for the trash.
First, on the topic of ice. I like ice. If I’m not drinking something hot, I want it to be cold. Not just cold, freezing cold. I add ice to pretty much everything I drink at home; I add it all my sports bottles when I’m active outside or at the gym; and now that it’s summer, I’ve been making various smoothies and other frozen drinks with my Vitamix blender on a daily basis. Needless to say, I go through a lot of ice.
Obviously there are plenty of choices when it comes to ice – you can buy it, you can freeze your own, you can use the ice maker in the fridge if you have one – and I’ve done all. Buying it’s a pain, and typically it melts enough to form a solid block after it’s been placed back in your freezer. Using trays to freeze your own is both a hassle and doesn’t produce nearly enough to meet my ice quota. And as for the fridge, I’ve never been happy with the quality of ice they produce, as it tends to both develop an unpleasant taste and grow frosty over time. All of this led me to consider the Electrolux Icon ice maker, and after a fair amount of deliberation questioning whether I really needed a dedicated ice maker, I finally decided to take the plunge.
As for what would handle the trash in the kitchen, I can’t stand garbage cans. They stink; you have to empty them every few days; and now that I have a Herculean two year old that quite literally breaks every child proofing device in the house by using a brute force attack, even an in-cabinet child-proofed garbage can wasn’t safe from his destructive grip. I knew there had to be a better way to handle the trash, which led me to the Electrolux Icon trash compactor.
So that, in a nutshell, is why I purchased the Electrolux Icon ice maker and trash compactor. Now that I’ve lived with them for a few months, here’s what I think of each.
Electrolux Icon Ice Maker ($1,799)
First up is the Electrolux Icon ice maker. I’ve already told you of my affinity for cold drinks, so an ice maker for me was a logical addition to my kitchen. But even despite my love of cold drinks and the large amounts of store bought ice I already consumed on a daily basis, it was the ice maker purchase that I deliberated the most. It’s not easy giving up cabinet space, but I eventually decided that for me, the functionality outweighed the negatives, so I went for it. Having lived with the Electrolux Icon ice maker for the past three months, I can tell you it does one thing, and it does it very, very well: it makes ice, and lots of it.
![]() Let’s talk volume. If you want ice, the Electrolux Icon is capable of producing up to 60 pounds of ice a day, and at any given time, it stores up to 30 pounds of ice. I can tell you that for home use, you will never again want for a cold drink. I’ve yet to come close to maximizing the production output of the Electrolux Icon – this after hosting numerous dinner parties, cookouts, trips to the beach filling a cooler, you name it. This thing is like having Alaska under your counter. Is it overkill? Maybe. But when you’re buying an ice maker, there should never be an instance when you don’t have enough ice, and from a volume standpoint, the Icon delivers, without question.
Let’s talk volume. If you want ice, the Electrolux Icon is capable of producing up to 60 pounds of ice a day, and at any given time, it stores up to 30 pounds of ice. I can tell you that for home use, you will never again want for a cold drink. I’ve yet to come close to maximizing the production output of the Electrolux Icon – this after hosting numerous dinner parties, cookouts, trips to the beach filling a cooler, you name it. This thing is like having Alaska under your counter. Is it overkill? Maybe. But when you’re buying an ice maker, there should never be an instance when you don’t have enough ice, and from a volume standpoint, the Icon delivers, without question.
But as impressive as its production volume is, the area that has impressed me most with the Electrolux Icon ice maker is the quality of the ice it produces. Virtually all ice used at home has a certain cloudiness and/or frosty element to it. It’s never that perfectly clear ice you actually want it to be. The Electrolux Icon ice maker is the exception. It produces gorgeous, absolutely clear ice cubes unlike anything I’ve ever seen at home. Electrolux states it produces restaurant quality ice, but in truth, the quality is better than most (if not all) restaurants.
![]() Making the magic happen, the Electrolux uses a cascading design that continuously runs water down a vertical, freezing surface. Over time, more and more frozen water accumulates, while impurities are continuously removed throughout the process. Eventually, once the thickness reaches the correct dimensions, gravity takes over, and the ice falls into the bin. It’s actually quite an interesting design, as it’s almost like watching a stalactite form in a cave (albeit in a cube shape), but most importantly, it produces crystal clear, incredibly good ice. It’s funny – prior to the Electrolux, I didn’t really think of ice as being good or bad, but after owning it, I can tell you the Electrolux ice is simply better. The ice doesn’t crack when your drink hits it; it instantly cools, quite literally before you’re even done filling your glass; it blends fantastically, due to its unique surface area; and most importantly, it’s completely clear and tasteless. And unlike both store bought and refrigerator ice, the Electrolux ice is completely frost free throughout the entire storage container. It’s without question the best ice I’ve had at home, and as I already noted, it’s better than virtually all restaurant ice as well.
Making the magic happen, the Electrolux uses a cascading design that continuously runs water down a vertical, freezing surface. Over time, more and more frozen water accumulates, while impurities are continuously removed throughout the process. Eventually, once the thickness reaches the correct dimensions, gravity takes over, and the ice falls into the bin. It’s actually quite an interesting design, as it’s almost like watching a stalactite form in a cave (albeit in a cube shape), but most importantly, it produces crystal clear, incredibly good ice. It’s funny – prior to the Electrolux, I didn’t really think of ice as being good or bad, but after owning it, I can tell you the Electrolux ice is simply better. The ice doesn’t crack when your drink hits it; it instantly cools, quite literally before you’re even done filling your glass; it blends fantastically, due to its unique surface area; and most importantly, it’s completely clear and tasteless. And unlike both store bought and refrigerator ice, the Electrolux ice is completely frost free throughout the entire storage container. It’s without question the best ice I’ve had at home, and as I already noted, it’s better than virtually all restaurant ice as well.
On a final note, the design of the Electrolux Icon ice maker bears mentioning (as does the trash compactor). Like the Electrolux Icon dishwasher, the exterior of the Electrolux Icon ice maker and trash compactor are identical, and they look like a solid piece of steel, with the controls for both located inside the respective units. From the outside, they’re literally a wall of stainless steel with a handle that matches the rest of the Electrolux Icon Professional series. It’s a beautiful design that really works in any style of kitchen, and in the event you’re purchasing multiple Electrolux Icon appliances, you have the option of placing the units directly next to one another, creating a virtually seamless design in your kitchen. They’re simply gorgeous together.
Would I recommend the Electrolux Icon ice maker? If you like your summer drinks luke warm, the Electrolux ice maker isn’t for you. But if you like ice, then absolutely. The Electrolux Icon ice maker has a singular job to do, and it does it perfectly. Now that I own it, I can tell you that I use it every day, and it’s become an integral part of my daily routine. Whether it’s in your kitchen, an outdoor cooking area or your in-home bar, if you’re looking for the best way to make ice at home, this is it.
You can learn more about the Electrolux Icon ice maker at the official Electrolux Icon website.
Electrolux Icon Trash Compactor ($1,099)
If I had to pick my least favorite element in the kitchen, it’s the element of the trash. My wife and I try to cook as many fresh meals as possible, meaning we have a relatively large amount of garbage that quickly develops an odor. Even worse, my two year old son during his daily pillaging of the house finds the trash to be one of his key conquests, so despite switching to an-cabinet design paired with child-proofing, he still managed to use his Herculean-like grip to force the cabinet open to get to it. As such, we made the switch to the Electrolux Icon trash compactor, and it has to a very great extent, eliminated the negatives of trash in a kitchen.
![]() Let’s get to the main point of a trash compactor first: how well does it compact? Statistically speaking, the Electrolux Icon Trash Compactor is capable of producing 3,000 pounds of force. Having never owned a trash compactor, I had no idea how well 3,000 pounds of force would compact, but after using it, I can tell you it’s roughly quadrupled the length of time a single bag will last. This is going to vary depending on exactly what you compact, but in my house, with what I would consider normal garbage usage, this is an easy benchmark. Interestingly enough, prior to purchasing the Electrolux Icon trash compactor, I read a couple brief reviews criticizing its compaction abilities, with one reviewer noting they still had to empty the trash every 3 days. Unless you’re running a commercial kitchen, this simply isn’t the case. I’ve yet to have an instance where the Electrolux Icon trash compactor failed to compact whatever I’ve asked it to. Initially, with a new bag, trash compaction is limited, but this isn’t due to lack of power. It’s simply because the compaction press doesn’t extend to the bottom of the container. With a few pieces of garbage, there’s virtually no compaction, but as more trash is added, the unit compacts more and more. Once you have a reasonable amount of trash, you’ll notice the trash level stays at almost an identical level – it looks about half way full, you add garbage, run the compaction cycle, and it still looks half way full. In fact, my current load has been at about the same level for nearly a week. From a compaction standpoint, I’ve been ecstatic with the results.
Let’s get to the main point of a trash compactor first: how well does it compact? Statistically speaking, the Electrolux Icon Trash Compactor is capable of producing 3,000 pounds of force. Having never owned a trash compactor, I had no idea how well 3,000 pounds of force would compact, but after using it, I can tell you it’s roughly quadrupled the length of time a single bag will last. This is going to vary depending on exactly what you compact, but in my house, with what I would consider normal garbage usage, this is an easy benchmark. Interestingly enough, prior to purchasing the Electrolux Icon trash compactor, I read a couple brief reviews criticizing its compaction abilities, with one reviewer noting they still had to empty the trash every 3 days. Unless you’re running a commercial kitchen, this simply isn’t the case. I’ve yet to have an instance where the Electrolux Icon trash compactor failed to compact whatever I’ve asked it to. Initially, with a new bag, trash compaction is limited, but this isn’t due to lack of power. It’s simply because the compaction press doesn’t extend to the bottom of the container. With a few pieces of garbage, there’s virtually no compaction, but as more trash is added, the unit compacts more and more. Once you have a reasonable amount of trash, you’ll notice the trash level stays at almost an identical level – it looks about half way full, you add garbage, run the compaction cycle, and it still looks half way full. In fact, my current load has been at about the same level for nearly a week. From a compaction standpoint, I’ve been ecstatic with the results.
In terms of operating the Electrolux Icon trash compactor, running it is about as easy as you can get. At the most basic level, you open the door, slide out the lower trash container, add your trash, press start on the control panel, close the trash container and door, and the unit runs the trash compaction function. From there, you can also use additional control functions, such as a delayed start (if you want to run the unit at a specific time), a hold function that keeps the compaction press lowered (making it impossible to open the trash storage container), and the on/off key (which if removed, makes the unit inoperable). As a parent, I can tell you that I love the hold function, as I typically run the hold function at night, which not only keeps the trash compacted for an extended period of time, it means that my son can’t sneak into the kitchen in the morning and open it. The delay function, on the other hand, I’ve found I seldom use, as I typically run the trash compaction cycle as necessary. The complete cycle runs for a maximum of 45 seconds (usually less), and in terms of sound, it’s quieter than having a faucet running. As such, I’ve found the compactor virtually never presents enough of a distraction not to run it immediately. And the on/off key provides an added level of security, especially when we have a babysitter watching the kids and we don’t want the unit to be run in our absence.
![]() From an engineering standpoint, there’s two things that work absolutely beautifully on the Electrolux Icon trash compactor, the first of which is the bag removal. Whereas normal trash bags tend to stick in conventional garbage cans once full, removing the bag from the Electrolux trash compactor is accomplished by unhooking two clips located at the front of the trash bin, and simply sliding the bag out. It’s by far the easiest and cleanest way I’ve experienced to handle the trash. The second element is how odor is handled. Built into the Electrolux Icon trash compactor is a deodorizing system, and I have to say, it does an incredible job neutralizing the smell that traditionally accompanies garbage. The majority of the time, there’s virtually no smell at all, save for at the very end of a load, when it’s time to empty the bag. And this is with all garbage, including food scraps, included in the trash – we don’t separate anything, aside from recyclables that don’t have an odor anyways. It’s funny – the compactor’s smell is typically how I determine it’s time to empty the trash, as the compactor feels like it would keep compacting forever. Any odor, however, is only experienced when the trash compactor door is open, as the door keeps one-hundred percent of any odor that does exist sealed inside.
From an engineering standpoint, there’s two things that work absolutely beautifully on the Electrolux Icon trash compactor, the first of which is the bag removal. Whereas normal trash bags tend to stick in conventional garbage cans once full, removing the bag from the Electrolux trash compactor is accomplished by unhooking two clips located at the front of the trash bin, and simply sliding the bag out. It’s by far the easiest and cleanest way I’ve experienced to handle the trash. The second element is how odor is handled. Built into the Electrolux Icon trash compactor is a deodorizing system, and I have to say, it does an incredible job neutralizing the smell that traditionally accompanies garbage. The majority of the time, there’s virtually no smell at all, save for at the very end of a load, when it’s time to empty the bag. And this is with all garbage, including food scraps, included in the trash – we don’t separate anything, aside from recyclables that don’t have an odor anyways. It’s funny – the compactor’s smell is typically how I determine it’s time to empty the trash, as the compactor feels like it would keep compacting forever. Any odor, however, is only experienced when the trash compactor door is open, as the door keeps one-hundred percent of any odor that does exist sealed inside.
In the end, the Electrolux Icon trash compactor really has done an impressive job eliminating the negatives typically associated with garbage in a kitchen. It’s compaction abilities mean you have to empty your garbage significantly less than with traditional trash cans. If you have kids, it offers a truly effective solution to keep your kids out of the garbage, and has a variety of built-in safeguards to ensure their safety. When it’s time to empty the trash, it’s incredibly easy to do so. And last but not least, it does a remarkable job eliminating odors commonly associated with the garbage. As much as I hate dealing with garbage, I can say this is by far the best way I’ve found to deal with it. While it’s certainly not the first appliance that comes to mind when planning a new kitchen, I will say the Electrolux Icon trash compactor offers functionality that I really have grown to love.
You can learn more about the Electrolux Icon trash compactor at the official Electrolux Icon website.